Polymer Clay Fan

Free Sculpting Tutorials

Search Results

Vaseline

Posted by goregt On May - 31 - 2007

Using Vaseline With Polymer Clay

I’ve already covered the use of Vaseline in a few of my tutorials but though I should also do a little write up on it under the tools section of this site. Vaseline, or Petroleum Jelly, is used to help non-baked clay, which I will refer to as new clay in this article, stick to baked clay. One of the benefits of working with polymer clay is that you can bake the sculpture multiple times during the sculpting process. This key advantage allows you to bake the sculpture in stages verses having to sculpt the entire piece before baking. Read the rest of this entry »
Super Sculpey

Posted by goregt On September - 8 - 2009

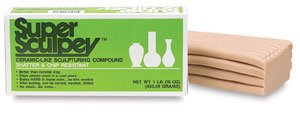
Super Sculpey

Out of all the polymer clays that I have used thus far Super Sculpey is by far my favorite. It is a huge improvement over the original Sculpey which in my opinion is way too soft for detailed sculpting. Super Sculpey offers the best of both worlds by being firm enough to sculpt a high level of details but also soft enough to manipulate the clay with ease.

If there is one disadvantage or downfall with Super Sculpey it is that the color has a tendency to make it harder to see things like fingerprints in the clay. The light beige color is translucent and after hours of sculpting it can put a strain on your eyes (or at least mine). There are ways around this and the easiest fix is to mix Super Sculpey with another colored polymer clay like Fimo or Premo. I’ve done this many times and the color that I like to best work with is a medium shade of gray. Gray is easier on my eyes and makes it to see all of the details, including the unwanted fingerprints. Read the rest of this entry »

Sculpting Tentacles – Lesson Two

Posted by goregt On August - 26 - 2009

If you are using a polymer clay and are happy with the results from the previous lesson then I would recommend that you go ahead and bake your sculpture. It’s not a requirement but you will mess up the details if you like to hold your sculpture in you hand while you sculpt. If you choose to bake your polymer clay sculpture make sure that you apply Vaseline to the baked piece before proceeding with this tutorial. Read the rest of this entry »

Mold Making – Step Five

Posted by goregt On August - 21 - 2009

After the silicone in the second half of our mold box has cured it is time to remove our sculpture from the mold.  I’ll go ahead and warn you ahead of time that in most cases your sculpture, or at least part of it, will get destroyed in the process.  The steps for this lesson is documented below.

  1. Remove the mold from the X-acto board mold box.  Carefully separate the two mold halves.
  2. If any of the silicone is sticking together (an area that was not covered with Vaseline), use an razor blade to carefully cut the silicone.
  3. Remove the sculpture from the mold Read the rest of this entry »

Mold Making – Step Four

Posted by goregt On August - 20 - 2009

In the last lesson we covered the steps on how to create one half of our silicone mold.  The next and final step is to create the second half of our mold.  I have documented the  process below.

  1. Once the silicone has cured it is time to cleanup the portion of the sculpture that was covered with the clay bed that we created in lesson two on this tutorial.
  2. The first thing that I do is remove the X-acto board box.  Be careful not to destroy the box since we will be using again for the second half of our mold.
  3. Once the box has been removed carefully remove the clay bed from the sculpture and the cured silicone.  I use alcohol to cleanup the remaining clay off of my sculpture and the silicone covering the first half of my piece. Read the rest of this entry »

Shoulder Bumps

Posted by goregt On August - 17 - 2009

Adding Bumps To The Shoulders

OK, I know we have been through this song and dance before but since it is such a catchy tune we are going to sing it just one more time. I liked the way the bumps turned out on the traps and the chest and wanted to blend the same design into the shoulders. The key was to try and create a pattern with my design that didn’t look like I just threw a bunch of balls of clay onto my sculpture. Basically what I did was follow the individual shoulder muscles and placed my pattern in them. I’m pretty happy with the way it turned out and have documented the process below.

Read the rest of this entry »

Attaching the Arm to the Shoulder

Posted by goregt On August - 14 - 2009

Attaching the arm

All right, so we have rebuilt the arm and now it is finally time to reattach it back to the sculpture. I went ahead and baked the existing arm so that I did not mess up any of the details. In hindsight this method could be improved if you planned to use the polymer clay sculpture as a final piece.

Even though the arm did attach relatively well there are a few weak points which I will point out in a minute. If I had to do it all over again I would want to do a better job of anchoring the arm into the shoulder instead of relying on a thin piece of clay as the support (probably would use wire, some form of bondo or superglue – however make sure whatever you use is not toxic if you have to heat it up in an oven or with a heat gun).


  1. Apply a thin layer of Vaseline to the base of the arm and the shoulder where the arm is missing.
  2. Add a layer of fresh clay to the arm
  3. Attach the arm and blend the clay from the shoulder to the upper arm
  4. Bake the sculpture (or heat the area with a heat gun)

Read the rest of this entry »

Adding Hair to the Elbow

Posted by goregt On August - 12 - 2009

Sculpting Hair Onto the Elbow

I wanted to add a little pizzazz to my arm so I decided to add some hair flowing from the elbow. Since the arm is already detached the best and easiest approach from this point is to sculpt the hair before reattaching the arm to the Fiddler’s shoulder. The pictures below will take you step by step through the process. In the third and fourth picture I used 90% alcohol to smooth out the sculpture.

* Keep in mind that Vaseline is required when adding new clay to baked clay (If you have no idea what I’m talking about start at the begging of this tutorial and work your way back here 😉 ).

Read the rest of this entry »

Attaching Hand To Fiddle

Posted by goregt On June - 14 - 2007

Attaching the Hand to the Fiddle

Hands are tricky so I like to sculpt them individually when possible and add them to the sculpture as a separate piece. In this tutorial I am going to take the hand from the previous lesson and attach it to my already baked fiddle.

I’m approaching this sculpture as if it was a puzzle adding each section together one piece at a time. What is nice about this step is that I am that much closer to adding the fiddle to my Fiddler. The fiddle really brings out the feel of the piece and I am really looking forward to seeing it all put together.

Read the rest of this entry »

Using Alcohol on Polymer Clay

Posted by goregt On May - 31 - 2007

Using Alcohol With Polymer Clay

Rubbing Alcohol is a great tool that is used to help smooth and blend polymer clay when sculpting.  Like the Vaseline tutorial, I have several other tutorials where I give examples on how I use alcohol while sculpting (I’ve included a few examples at the bottom of this page).  When I first started sculpting I used water based clay (I had never even heard of polymer clay at that time).  With the water based clay I was able to achieve a smoothing and blending effect by using a wet sponge or Q-tip.  However, when I started using polymer clays, water did not have the same effect.  At first I tried to use water and Q-tip on my polymer clay but the results were pretty poor.  After doing a lot of research on the internet I discovered that rubbing alcohol dissolves polymer clays.  Thanks to other polymer clay artist I was able to learn that alcohol on a Q-tip, sponge or paint brush has the same effect as water on water based clay. I have experimented with different potencies of rubbing alcohol and found that not all are created equal.

Read the rest of this entry »

VIDEO

Enter the video embed code here. Remember to change the size to 320 x 270 in the embed code.

TAG CLOUD

Recommended Sites

About Me

Nothing special, just a self-taught sculptor having fun with my art and showing all of you the tips and tricks I use to create my own artwork

Twitter

    Photos

    Activate the Flickrss plugin to see the image thumbnails!