Polymer Clay Fan

Free Sculpting Tutorials

Mold Making – Step Five

Posted by goregt On August - 21 - 2009

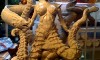
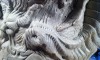
After the silicone in the second half of our mold box has cured it is time to remove our sculpture from the mold.  I’ll go ahead and warn you ahead of time that in most cases your sculpture, or at least part of it, will get destroyed in the process.  The steps for this lesson is documented below.

  1. Remove the mold from the X-acto board mold box.  Carefully separate the two mold halves.
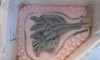
  2. If any of the silicone is sticking together (an area that was not covered with Vaseline), use an razor blade to carefully cut the silicone.
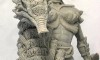
  3. Remove the sculpture from the mold Read the rest of this entry »

Mold Making – Step Four

Posted by goregt On August - 20 - 2009

In the last lesson we covered the steps on how to create one half of our silicone mold.  The next and final step is to create the second half of our mold.  I have documented the  process below.

  1. Once the silicone has cured it is time to cleanup the portion of the sculpture that was covered with the clay bed that we created in lesson two on this tutorial.
  2. The first thing that I do is remove the X-acto board box.  Be careful not to destroy the box since we will be using again for the second half of our mold.
  3. Once the box has been removed carefully remove the clay bed from the sculpture and the cured silicone.  I use alcohol to cleanup the remaining clay off of my sculpture and the silicone covering the first half of my piece. Read the rest of this entry »

Mold Making – Step Three

Posted by goregt On August - 19 - 2009

In the last lesson we covered the steps to created a mold box. Creating the mold box is half the formula in the mold making process and the next step will bring us closer to being able to replicate our artwork. The next process is time consuming and dirty but the results are worth every bit of the effort.

  1. In the fist lesson we went over silicone as one of the materials needed for making a mold. There are a quite a few different brands of silicone out there so the key is to follow the manufacture instructions on whichever silicone you choose to use. My silicone of choice is the Smooth-On Mold Max 20. It’s a great rubber to work with and has been worth every penny in my investment. The rubber comes in a two parts (the silicone and the catalyst)
  2. A scale is crucial for weighing out the silicone. Ideally a digital scale would be preferred but a food scale can work just as well (just don’t use it for food anymore). Normally what I do is calibrate my scale so that the weight of the cup brings the scale to zero (0). I also pour my silicone in stages, for example if my box requires 30 ounces of silicone I’ll pour 10 ounces at a time (with 10 ounces of Part A and one ounce of Part B – the mix ratio is included with the instructions on the silicone but in most cases it is 10:1).
  3. Follow the manufacture instructions for stirring the silicone. A paint stick works great but keep in mind that as the silicone thickens it will become harder to mix. I usually mix mine for a minimum of 3 to 6 minutes. Make sure that the color is consistent all the way through (in my case the color is a bright pink). You do not want to see streaks of the base color in the mix (doing so will result in sections of the silicone not curing). Read the rest of this entry »

Mold Making – Step Two

Posted by goregt On February - 14 - 2009

The Second Step for Making a Mold

The key ingredients for making a successful mold is planning and patience. Planning is obvious but patience can easily be overlooked. It is important that you take your time and do everything step with and precision. Otherwise what is the point of spending all that time creating your sculpture if you are not going to be able to replicate it with the same type of quality and detail.

This tutorial will cover in detail on how to make a mold box. The mold box is what is going to be used to hold the silicone while it hardens. In future lessons we will go into detail on how the final mold is created.


Read the rest of this entry »

VIDEO

Enter the video embed code here. Remember to change the size to 320 x 270 in the embed code.

TAG CLOUD

Recommended Sites

About Me

Nothing special, just a self-taught sculptor having fun with my art and showing all of you the tips and tricks I use to create my own artwork

Twitter

    Photos

    Activate the Flickrss plugin to see the image thumbnails!