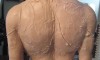
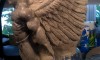
Not a lot going on with this lesson but I thought I would give a look at the back from one more angle. The left side of the back is as far as I’m going to take it until I move forward with the right half of my back. I wouldn’t recommend sculpting a back this way because it can mess up the balance of the muscles in the piece. The best approach is the sculpt the entire form at once. The only reason why I broke it down into the shapes is because I wanted to show a contrast between the two halves. Read the rest of this entry »
Tribal Back – 4
On October - 6 - 2009
The top half of my back still needs some work but I want to move on to the lower back to try and pull all the shapes together. I’m going to need to start working on the right half of the back pretty soon to make sure that all the shapes are coming together correctly. Once I sculpt the right half I should get a good idea if any of the individual shapes need to be reworked.
For this step I’m sculpting the muscles and skin folds that make up the lower back. Again using a loop too I carve out the areas individual muscles. If I carve away too much I can always go back and add little bits of clay here and there but since the lower back already has too much clay I can carve away the shapes for the folds of skin (and muscles). Read the rest of this entry »
Tribal Back – 3
On October - 5 - 2009
Step three in this tutorial builds on the first two steps that we used to sculpt the back. I continue to build out the individual forms by adding and removing clay to mimic the shapes in my resource material.
For this sculpture I am sculpting the details on the left side of the back first and then will move to the right side. I’m only doing it this way because it is a little easier to create a tutorial using this method. If I was just sculpting this without trying to document the process I would sculpt both side of the back at the same time. Read the rest of this entry »
Tribal Back – 2
On October - 1 - 2009
In the last tutorial I briefly went over how I like to draw out a rough outline of the different muscles. I use this trick on quite a few places on the body and it really helps be understand and build out the individual shapes. For example, I like to draw out the individual muscles when I sculpt muscular arms and very lean abs. The back also has a lot going on so even though my outline is pretty rough it still helps me break down the back into the individual muscles (or shapes).
The first step is to separate my back into two halves. Now you can’t just simply carve a line down the center of the back, otherwise your sculpture will look like it has a canon going down the center of it. To make the back look more natural I will blend the two halves of the large back muscles (latissimus dorsi) into the area of where the spine is located. This task is easily accomplished by carving the center edges of the back until it gently slopes to the spine. I keep working both halves of the back until I get a look that I am happy with. Read the rest of this entry »
Tribal Back – 1
On September - 30 - 2009
Sculpting a back can be a little tricky and I’ve always found it to be a bit challenging as well. There are a lot of different muscles and bones that make up the back and more importantly the shapes they create come and go into all different directions. Now sculpting a back with more body fat on it would decrease the difficulty but I prefer designs of a leaner physique. However, the key with this sculpture is to not go too lean on the back because it will not flow well with the rest of the design.
I have already sculpted a rough shape of the back when I blocked out the torso. Now I need to tie the individual muscles together while trying to make it look natural. Using a sharp sculpting tool I like to draw out some of the individual shapes. Basically I’m trying to break out the scapula, traps and lower lats into different basic shapes. Once this stage has been completed I will build out the individual forms. Read the rest of this entry »
Blending in the Scars
On September - 29 - 2009
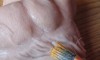
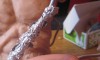
OK, for this lesson I will briefly cover the steps for blending the small round scars. I like to first layout my design before blending the shapes into the rest of the sculpture. The reason why is because if my spacing is off or I don’t like the way the design is taking shape I can easily make changes. Otherwise I would have to scrape away clay, smooth out the belly and start over.
Once I have everything where I want I just take a flat edge sculpting tool and blend the edges of my small ball shaped scars. The key is to make sure you blend all of the edges. To accomplish this I like to look at the sculpture from all kinds of angles. It is amazing how a sculpture changes when you look at it from a different angles, everything may like fine from one end while when you look at it from the other end all kinds of mistakes or imperfections appear. The same point holds true when painting a sculpture but that is another tutorial in itself. Read the rest of this entry »
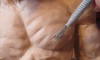
Sculpting the Belly Button
On September - 21 - 2009
In this next tutorial I will walk you through the steps for sculpting a belly button. Belly buttons are actually made up of interesting shapes and there really is a lot more to sculpting them then just creating a hole inserted into the clay. Now belly buttons come in all types of shapes and designs but there are some traits that are common in most belly buttons. For instance there are small folds of skin in and around the belly button. Also, if you look closely the design and shape of the stomach also changes around belly buttons as well.
Because belly buttons come in all kinds of shapes and sizes there are many different types of belly buttons that you can sculpt. Keep in mind that this tutorial is just one example of how a belly button can look. So use this tutorial as one option for sculpting a belly button and see what designs you can come up with. Read the rest of this entry »