My goal for this tutorial is to show step-by-step how the GoreArtistry cigar ashtrays are created from concept to the final product. The tutorial will be covering the following topics.
- Basic picture tutorial for the sculpting of the ashtray
- Creating the mold
- Pouring a cold-cast bronze
- Sanding and polishing the cold-cast bronze
- Final product
The first step in any project is coming up with a design. Great sculpting on top of a poor design will in most cases result in a mediocre product. However, I’ve seen projects that have great designs with average sculpting skills create something that really is interesting to look at. My goal is to hopefully strive for the best of both worlds with a product that results from above average sculpting skills and a great design (we shall see if I’m able to pull it off).
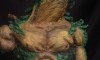
For awhile now I’ve wanted to make a cigar ashtray that formed the shape of a vase. The shape gives an opportunity to not only create something that is very functional but also gives me the ability to stretch those artistic muscles by coming up with design that truly is unique. My new ashtray will hold four cigars so a vase can easily be split up into a variety of different sections. I opted to split my vase into two sections by sculpting a muscular warrior angel on one end and a demon on the other. Both the angel and the demon will have wings that merge together creating a couple unique cigar holders.
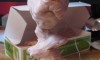
The easiest way to approach this project is to find a vase that has the shape and size that I am looking for (actually this step had some challenges since it took a few weeks to find a vase that I could work with). Keep in mind that I predominantly sculpt with wax these days so it really does not matter what material the vase is made of. If I was sculpting with polymer clay I would need to find something that can withstand heat when I reached the baking stage.
I found a vase at a local Hobby Lobby that roughly has the size and shape that I wanted for this project. I purposely picked a large vase for this project since I wanted to add a lot of details to this piece.

In the upcoming post I’ll show pics of the various sculpting stages. I’m not going to go into great detail on how I sculpt the individual pieces since my main goal here is to give an example of how I create a product from conception to production. The other problem with going into a lot of detail for the individual sculpting stages is that it really slows me down and I have a short time-line for this particular project.
** On a side note I hardly draw anymore so most of the ideas for my projects float around in my head until I can flesh them out in the wax. There are a lot of sculptors that will draw their ideas out on paper first, I just opt to sculpt it from stage one.