From my experience there is a vast difference in the amount of effort that is required to smooth out wax sculptures versus sculptures sculpted with any of the polymer clays. The underlying principles and concepts are the same but wax, when cooled, is a much harder medium and thus requires quite a bit more work to achieve the desired result. Keep in mind that this is under the assumption that you smooth out your polymer clay sculptures prior to baking, which I have always done in the past. Some sculptors will bake their polymer clay sculptures and use wet sanding techniques for the final smoothing stages (this process will exponentially increases the amount of work needed to smooth out the sculpture).
FUSE Review
On December - 8 - 2008
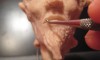
Recently I had put together a little article that outlines some of the key differences between sculpting with wax and polymer clays (http://www.polymerclayfan.com/sculpting-with-wax-vs-polymer-clay.htm). In hindsight, the review was more of a comparison between sculpting with Super Sculpey and a relatively new wax called FUSE. I think it is important to point out that not all polymer clays are created equal and the same case could be made for wax. As of the writing of this article, FUSE is the only wax I have ever tried so the chances are that my opinions regarding sculpting with wax could drastically change from one wax product to another.
Sculpting FAQ
On May - 9 - 2008
How long have you been sculpting: As of writing this a little over 4 1/2 years (started in late November 2003)
How did you learn to sculpt (any formal education)? Self-taught. Just bought some clay and started playing with it.
Do you make a living as an artist? Nope, went to school to get a BBA in Management Information Systems because I bought into the whole “starving artist” mentality. I’m working on undoing that mentality 😉
Fixing the forearm
On July - 13 - 2007
Fixing the forearm
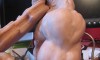
 Well, I’m definitely not perfect and I am also not afraid to show my mistakes. I do learn a lot from my mistakes and I think posting them on this site also helps others learn as well. If you have been following the tutorials on this site for awhile then you may remember me mentioning that you need to be careful when bulking out a sculpture to aluminum foil. Well, now you are about to get a good example on why I said that.
Attaching Hand To Fiddle
On June - 14 - 2007
Attaching the Hand to the Fiddle
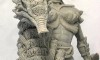
Hands are tricky so I like to sculpt them individually when possible and add them to the sculpture as a separate piece. In this tutorial I am going to take the hand from the previous lesson and attach it to my already baked fiddle.
I’m approaching this sculpture as if it was a puzzle adding each section together one piece at a time. What is nice about this step is that I am that much closer to adding the fiddle to my Fiddler. The fiddle really brings out the feel of the piece and I am really looking forward to seeing it all put together.
Detailing Fiddle Scroll
On June - 4 - 2007
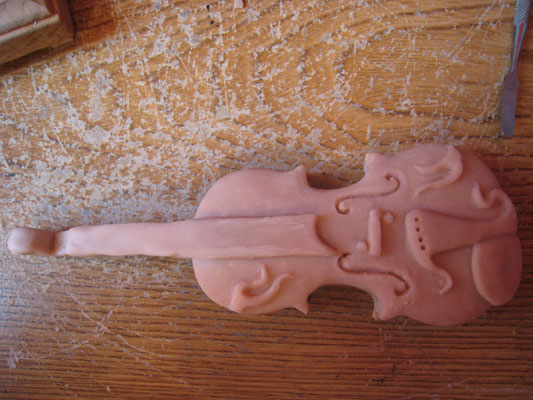
Detailing the Scroll
In our previous tutorial we started to build out the scroll on the fiddle. The base design for the scroll has been built and now it is is time to detail our fiddle’s scroll. I’m not going to fully complete the scroll by adding the keys yet but I do want to get the scroll where it is 95% complete. After this lesson, the fiddle really should look almost complete minus a few minor add-ons that will come later (keys, strings, etc).
What I like about the tutorials for the fiddle is they give a great example of how you can build a sculpture in stages. Instead of focusing on the entire piece you break it down into little individual projects. It is a lot easier to sculpt when you approach a project this way. The key is to focus on one small area at a time by trying to figure out how to create that one piece. Once figured out you then build it and then move on to the next little project. Repeat these steps several times and before you know it you have a completed piece.
Attaching the scroll to the fiddle
On May - 28 - 2007
Attaching the scroll to the neck of the fiddle
 In the previous tutorial I did a rough sculpt of the scroll (top piece) for the fiddle. The next step is to add the scroll to the neck of the fiddle. Once attached I will then begin to work on the details. The process for adding the scroll to the neck of the fiddle is the same process that was used to add the neck to the body. The first step is to lightly coat the baked pieces of clay with Vaseline, then take a tissue and wipe the excess off. Next just add a new thin layer of clay and the scroll should easily attach from there.
Dog Portrait Base
On May - 14 - 2007
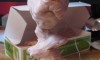
Sculpting a unique base for the dog portrait.
I’m only sculpting the dog’s head for this particular piece so I want to do something that gives the sculpture a little more pizzazz. Usually when I do pet portraits I like to add a unique rock formation base to the sculpture. The rocky base basically helps create a uniqueness with the piece and also gives a little more height to the sculpture.
Tools Needed
- Polymer Clay (Super Sculpey in this example)
- Sculpting tools
- Reference material (pictures of your subject matter or the subject matter itself)
- Lots of patience 😉 Read the rest of this entry »
Shaping Dogs Face
On May - 13 - 2007
Shaping the Dog’s Face
Now that we have built a good foundation for our dog portrait, it is time to start adding the details that will bring our sculpture to life. The detailing stage may be the most time consuming stage in the game but really is the most rewarding stage in the entire sculpting process. It is nice to see a chuck of clay shaped like a dog turn into an actual dog portrait.
The key is to take your time and not rush through this stage. Flying through this step will show in the end results to go ahead and already plan on investing a lot of hours to get the detailing done right. The final details will not be completed in this tutorial. The goal for now is to build out the dog’s face, with wrinkles and all, and add the polishing touches a little later down the road. Read the rest of this entry »
Dog Portrait
On May - 12 - 2007
Blocking Out the Dog Portrait
The first step to sculpting a dog portrait is to block out the face. If you have been following the Fiddler sculpting series then you are already probably familiar with some of these steps. The goal here is to get a rough shape of our dog. We will start adding and refining details in the later steps. Tools Needed
- Armature wire
- Aluminum foil
- Polymer Clay (Super Sculpey in this example)
- Sculpting tools
- Lots of patience 😉
Time to begin…… Read the rest of this entry »