How To Sculpt Hand With Polymer Clay
Two of the hardest things that I have found to sculpt are the hands and eyes. I don’t know why, they are just shapes like anything else, but for some reason they always present themselves as a challenge for me. I have a little technique that I am about to share with you that I use for most of the hands I sculpt. However, keep in mind that this is not the only method you can use to sculpt hands.
The technique that I use does not require an armature which has its advantages and disadvantages. I’ve have used and armature in the past but the problem I found is when I decided later on in the sculpting to move the fingers. The fingers can still be moved when using an armature but the detail work can sometimes get damaged in the process. The disadvantage of sculpting hands without an armature is that you do not get the additional support that an armature provides. If the hand you are sculpting is just hanging by the side it really is not an issue, however if your character is holding something like a sword it can then be a problem.
Now the hand in this tutorial is going to be more of a sketch to give you the general idea on how to sculpt a hand. This tutorial should give you a good foundation to start building your hands off of.
Hand sculpting tutorial
*I need to upgrade my digital camera and apologize in advance for the quality of the pictures
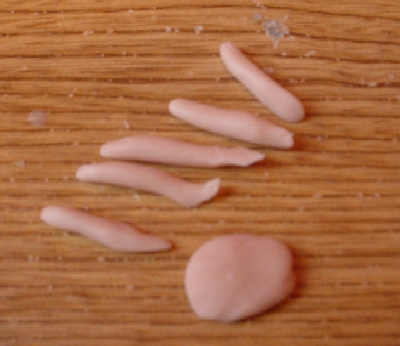 |
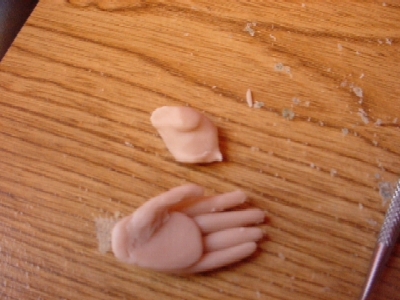
1. Roll out a ball of clay and slightly flatten it to the size that you want your palm.2. Roll out five little tubes of clay to represent the fingers |
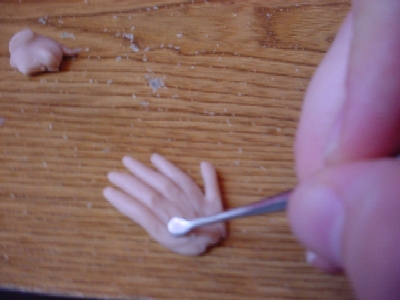 |
3. Strategically place the fingers onto the top of the squished ball of clay (look at your own hand as a reference)4. Using your sculpting tool, one of my dental tools in this example, pull the fingers into the base of the hand |
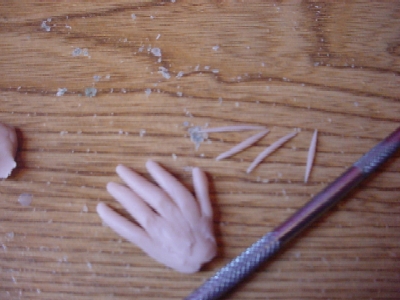 |
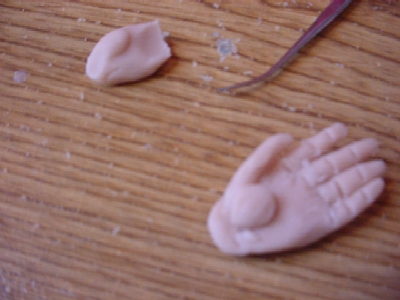
5. Roll out four more little tubes (snakes) to add as the bones in the hands |
 |
6. Roll out little balls of clay for the knuckles |
 |
7. Add little horizontal indentions or lines for the knuckles (using another one of my dental tools here)8. Sculpt the finger tips |
 |
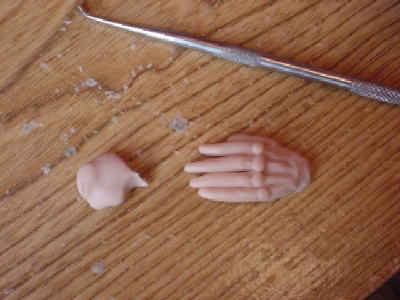
9. Turn over the hand and blend the fingers into the palms of the hand (try to avoid squishing the fingers) |
 |
10. Add a little more clay to the palm to thicken it up a bit. |
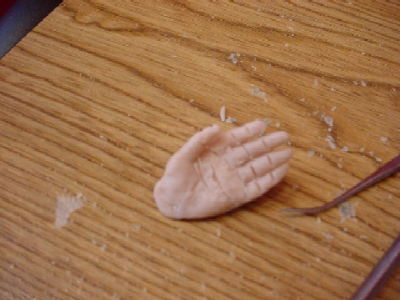 |
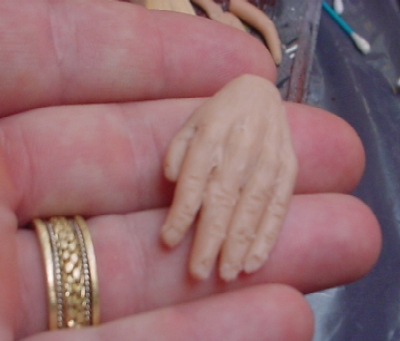
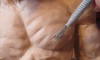
11. Add lines to the fingers to match the location on knuckles (on the other side of the hand). I have cut my lines a little deeper then needed since I will bend my fingers. |


Fantastic work! I wish that the photo’s could be bigger though.
I love your work! I have a question about sculpting hands. How do you close the hand and maintain the shape and details? I have used armature before on the hands and do not like them. Would it be best to shape after doing the hand or shape the hand around what its holding? Pre-baking the sword was a great idea thanks! I cant seem to get the joints and knuckles the way I want them when closing hands around the sword. Everything loses shape. Thank you for putting up the gallery and sharing your talent with us.
Shannon,
Thank you for the compliments on my artwork.
Regarding your hands questions:
I’ve used an armature too and do not like them at all on a hand. I prefer
to use just the clay like you saw in the tutorial. My recommendation is to
sculpt an open hand first (like the one you saw in the tutorial). A rough
sculpt is all you really need since you will have to do some additional
sculpting and detailing once you bend the fingers. The key is to get the
proportions and shapes down before bending the fingers.
Once the rough hand is complete then on the underside (where the palm is)
cut deep grooves where the fingers would naturally bend. Just mimic the
lines that you see on your fingers. The grooves need to be deep enough so
that they can easily be bent.
If you are attaching the hands to a pre-baked sword then I would recommend
applying Vaseline to the sword so that the unbaked clay sticks to the
sword. Position the fingers to how you like and then start focusing on
detailing the hand. Look at your own hands and images in Goggle on hands
grabbing swords. I did something similar with my Fiddler sculpting series
except my hand is grasping a fiddle and not a sword. The tutorial is
located at http://www.polymerclayfan.com/attaching-hand-to-fiddle.htm in
case you have not seen it yet.
Hands are tuff so stick with it. Even if it takes you a month to get it
down right just keep at it until you are happy with the results. The thing
about sculpting hands is that it gets easier each time that you do it.
Good luck and let me know if you have any other questions.
Thank you so much for your instructions. They are great and the pictures are very helpful.
I just love your art work. I am getting started in my adventures with polymer clay. I am scared but reading some of your tips I am getting really excited to start on my projects. I love the way the elderly look. So many lines in their faces and hands. So many stories are in these lines. I have tried to find web sites to go to help me with my journey,but have not been lucky enough to find any. Reading your tips about hands helped me. Thank you very much for giving people like myself a gentle push to get started. And for all of your art work and teachings. You are the greatest
I have jsut spent hours going over your website. I have to say “Superb” work! I am really impressed in the detail and hard work that you put in your sculptures and this website. I am now YOUR FAN! You’ve given me inspiration (and help) to go back to polymer clay figure sculpting. Keep it up!
i think your photo,s are great, your tips and advice alike. . .the hands are a real issue for me. . .everything else i can do. . .i,l try your method. . .i have tried some thing near to how you do them. . .its all trial and error. . .and patience!. . .great old saying. . . try try try and try again. . .and thanks to you, i,l try again. . .judi x x x
This tutorial is right on time. I’m just about to complete my first anotomically correct clay(premo), doll and I’ve done everything except the hands and the feet. I can’t wait to try your technique. I’ve been using the “Creager’s technique” but find it difficult, if not impossible to attempt rolling individual fingers to an already affixed palm. Your technique makes so much more sense. I can’t wait to try it. I anticipate finishing my doll soon, now that I’m aware of this technique. Thank you in advance.
Thank you very much for this tutorial. I had to make a hand for my toy assignment called hand of doom and this was just a thing I needed as I haven’t worked with clay much.
Thank you very much!
Fantastic tutorial – Thanks millions for sharing your technique. My first time sculpting a hand(heck it’s actually my first day sculpting anything, if the truth be known) and Sat here following your instructions and got a great looking hand made in less than a hr. Now praying the next one goes so well or they even sorta match, or now gotta make a body to match the hands oh gosh what a wicked web we weave.
Anyhow love your tut. Many many thanks!
I can’t wait to try this technique. I’ve been using my own combination of other tutorials, but this one looks better and makes more sense.
I am very much enjoying looking through your site. Thank you for helping us polymer clay aficionados like this.