Polymer Clay Fan

Free Sculpting Tutorials

Tribal Back – 4

Posted by goregt On October - 6 - 2009

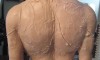
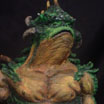
The top half of my back still needs some work but I want to move on to the lower back to try and pull all the shapes together. I’m going to need to start working on the right half of the back pretty soon to make sure that all the shapes are coming together correctly. Once I sculpt the right half I should get a good idea if any of the individual shapes need to be reworked.

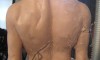
For this step I’m sculpting the muscles and skin folds that make up the lower back. Again using a loop too I carve out the areas individual muscles. If I carve away too much I can always go back and add little bits of clay here and there but since the lower back already has too much clay I can carve away the shapes for the folds of skin (and muscles). Read the rest of this entry »

Tribal Back – 2

Posted by goregt On October - 1 - 2009

In the last tutorial I briefly went over how I like to draw out a rough outline of the different muscles. I use this trick on quite a few places on the body and it really helps be understand and build out the individual shapes. For example, I like to draw out the individual muscles when I sculpt muscular arms and very lean abs. The back also has a lot going on so even though my outline is pretty rough it still helps me break down the back into the individual muscles (or shapes).

The first step is to separate my back into two halves. Now you can’t just simply carve a line down the center of the back, otherwise your sculpture will look like it has a canon going down the center of it. To make the back look more natural I will blend the two halves of the large back muscles (latissimus dorsi) into the area of where the spine is located. This task is easily accomplished by carving the center edges of the back until it gently slopes to the spine. I keep working both halves of the back until I get a look that I am happy with. Read the rest of this entry »

Tribal Back – 1

Posted by goregt On September - 30 - 2009

Sculpting a back can be a little tricky and I’ve always found it to be a bit challenging as well. There are a lot of different muscles and bones that make up the back and more importantly the shapes they create come and go into all different directions. Now sculpting a back with more body fat on it would decrease the difficulty but I prefer designs of a leaner physique. However, the key with this sculpture is to not go too lean on the back because it will not flow well with the rest of the design.

I have already sculpted a rough shape of the back when I blocked out the torso. Now I need to tie the individual muscles together while trying to make it look natural. Using a sharp sculpting tool I like to draw out some of the individual shapes. Basically I’m trying to break out the scapula, traps and lower lats into different basic shapes. Once this stage has been completed I will build out the individual forms. Read the rest of this entry »

Polymer Clay History

Posted by goregt On September - 9 - 2009

What is Polymer Clay

Polymer clay is a material you can sculpt. It is based on polymer polyvinyl chloride (PVC) material. It usually contains no clay minerals and is only called “clay” because its texture and properties resemble mineral clay. Polymer clay is sold in craft, art and hobby stores. It is used by artists, hobbyists and children.

All polymer clay brands include PVC and one or more liquid plastic. Pigments may be added to the base to create colors along with small amounts of kaolin or white china clay. Mica may also be added to make a metallic looking clay.

Read the rest of this entry »

Welcome – Polymer Clay Fan

Posted by goregt On August - 7 - 2009
Polymer clay example

Polymer clay example

Polymer clay is a unique sculpting medium that offers a versatility unmatched by any other product in its class. Although other sculpting mediums, such as waxes, may allow more ease for sharper details no other medium can duplicate polymer clays ability to easily create a completed work of art. Details are not foreign with polymer clay either, with enough time and practice anyone can create highly detailed artwork using nothing but polymer clay.This site is a collection of information, tips and sculpting tutorials for my favorite sculpting mediums…Polymer Clay.

My name is Gerald Gore and I am a self taught sculptor. The tutorials on this site are a step-by-step pictures of some of the sculptures I have created. You can read more about me and how I got started sculpting on the About page.

Read the rest of this entry »

Lazy Susan

Posted by goregt On August - 8 - 2008

The Lazy Susan is one of those tools that once you start using it you will wonder how you ever got along without it.  Maybe not ideal for small pieces but when sculpting larger pieces it really is a must have.  If you are not familiar what a  Lazy Susan is and have no idea what I am talking about you can read about it here http://en.wikipedia.org/wiki/Lazy_Susan.

When I first started sculpting I used a Lazy Susan for all my pieces.  Back then I was using a water based clay and the last thing that I wanted to do is pick a piece up and move it around.  When I shifted from water based to polymer clay based clays I for some reason for forgot all about this tool.  I recently rediscovered this little gem when I started working on one of my newer pieces (centaur image included at the bottom of the article – the Lazy Susan is the yellow plastic circle at the base of the sculpture).
Read the rest of this entry »

Sculpting with Wax vs Polymer Clay

Posted by goregt On July - 31 - 2008

Stop the press, isn’t this site suppose to be about polymer clay sculpting, after all the name of the site is Polymer Clay Fan! Yes you have read the title to this post correctly, I’ve started playing with wax lately and although I’m still wet behind the ears I thought why not put together a little post to compare the two mediums. I’m sure a few diehard polymer clay artists may snub their nose at this post but I recommend reading through the entire article before jumping to a conclusion. This isn’t an article about discrediting wax or even polymer clay, it is just my observation of the positives and negatives the two different mediums have to offer.

Read the rest of this entry »

Fixing the left arm

Posted by goregt On July - 13 - 2007

Working on the left arm

I think the theme for my latest tutorials is going to be about fixing mistakes.  I did not do a very good job with the armature at the beginning of this sculpture and I am now paying for it.  Basically the clay is too heavy for the shoulder and arm to support all of the weight.  I’m now having issues where the shoulder is splitting in half because of the weight of the arm and the fiddle.

Right now the only way that I see to resolve this issue is to bake the shoulder and arm as one piece and attach it to the Fiddler’s torso at a later time.  Most likely I’ll still have a weight issue at the point I attach the arm at so my workaround for that will be to partially bake the entire area where the shoulder attaches to (I’ll cover that in more detail later on)

Read the rest of this entry »

Fixing the forearm

Posted by goregt On July - 13 - 2007

Fixing the forearm

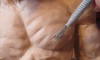
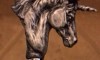
Well, I’m definitely not perfect and I am also not afraid to show my mistakes. I do learn a lot from my mistakes and I think posting them on this site also helps others learn as well. If you have been following the tutorials on this site for awhile then you may remember me mentioning that you need to be careful when bulking out a sculpture to aluminum foil. Well, now you are about to get a good example on why I said that.

Read the rest of this entry »

Sculpting the ears

Posted by goregt On July - 13 - 2007

Sculpting the Fiddler’s ears

I’ve been using these rough placeholders as ears for awhile now and it has gotten to the point where they are starting to bug me.  Ears take some patience to sculpt also so I have been putting them off for awhile.

Since I am sculpting the devil in this piece I decided to give him pointed ears shaped like an elf’s.  Just another tweak to add to the overall look of the piece.

* This sculpture is created with Super Sculpey.

Read the rest of this entry »

VIDEO

Enter the video embed code here. Remember to change the size to 320 x 270 in the embed code.

TAG CLOUD

Recommended Sites

About Me

Nothing special, just a self-taught sculptor having fun with my art and showing all of you the tips and tricks I use to create my own artwork

Twitter

    Photos

    Activate the Flickrss plugin to see the image thumbnails!