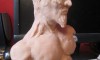
Adding a skin texture chest and abdominal muscles
The final step in the torso detail stage is to add a skin texture to the sculpture. I love textures and I think the skin effect really does enhance the sculpture. I’ve already covered a tutorial on one way that you you can sculpt skin details in polymer clay but this lesson is going to use a different approach. Keep in mind that this type of detailing will probably not look good with all sculptures but should create a nice look for this particular piece. If I decide to paint this piece, I will probably create a bronze finish and the skin details should look good with the paint.
Time to finish up the front portion of the torso. Again, the polymer clay I am using for this particular piece is Super Sculpey.
 |
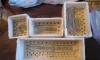
The sculpting tool I’m using here is a simple metal tool with a bunch of thin wires coming out of the end of it. I bought the tool at my local Hobby Lobby (tool was included with a doll sculpting kit). I think I spent around $15 to $25 for the sculpting kit which included around 5 tools. It is not my favorite tool but it quickly gets the results that I am looking for. You should try to create a pattern in the way that you scrape the lines. The lines should flow from one muscle to another and create interesting shapes. |
 |
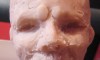
Ok, the torso is all scraped up now (at least the front part of it). |
 |
Using a stiff brush and 91% Alcohol I lightly tap the brush into the clay. The goal here is to blend the individual lines, created by the scraping technique from above, into one another. |
 |
A final shot of the sculpture in black and white (hopefully should be easier to view this way) |
Next lesson – New fiddle
Previous lesson Finalizing the torso details