Polymer Clay Fan

Free Sculpting Tutorials

Adding Hair to the Elbow

Posted by goregt On August - 12 - 2009

Sculpting Hair Onto the Elbow

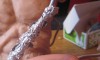
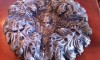
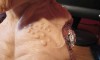
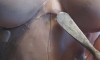
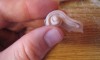
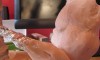
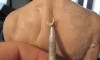
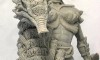
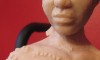
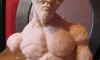
I wanted to add a little pizzazz to my arm so I decided to add some hair flowing from the elbow. Since the arm is already detached the best and easiest approach from this point is to sculpt the hair before reattaching the arm to the Fiddler’s shoulder. The pictures below will take you step by step through the process. In the third and fourth picture I used 90% alcohol to smooth out the sculpture.

* Keep in mind that Vaseline is required when adding new clay to baked clay (If you have no idea what I’m talking about start at the begging of this tutorial and work your way back here 😉 ).

Read the rest of this entry »

Fixing the left arm

Posted by goregt On July - 13 - 2007

Working on the left arm

I think the theme for my latest tutorials is going to be about fixing mistakes.  I did not do a very good job with the armature at the beginning of this sculpture and I am now paying for it.  Basically the clay is too heavy for the shoulder and arm to support all of the weight.  I’m now having issues where the shoulder is splitting in half because of the weight of the arm and the fiddle.

Right now the only way that I see to resolve this issue is to bake the shoulder and arm as one piece and attach it to the Fiddler’s torso at a later time.  Most likely I’ll still have a weight issue at the point I attach the arm at so my workaround for that will be to partially bake the entire area where the shoulder attaches to (I’ll cover that in more detail later on)

Read the rest of this entry »

Sculpting Tribal Arm

Posted by goregt On July - 13 - 2007

I think the pictures in this tutorial explain everything pretty well so just follow the images from left to right. Since my arms will be dangling at the side this method works pretty well.

If you plan to pose the arm or add additional weight to it by placing something in the hand then you would want to build an armature that supports the arm better then what I have shown below.

* This sculpture is created with Super Sculpey.

Read the rest of this entry »

Finish blocking off the arm

Posted by goregt On June - 17 - 2007

Finish blocking off the arm

In the previous lessons covering the arm on this sculpture the goal was to get a basic shape for the right arm.  Now it is time to start refining the shapes so that we can begin working on the details for the arm.

A lesson or two back I made a comment that the arm was going to look like a mess for awhile.  This is the lesson where the arm starts really looking like a muscular arm.

* This sculpture is created with Super Sculpey.

  1. Just as before I draw in lines to represent the individual muscles of the arm.
  2. I start adding a little clay here and there to bulk up the individual muscles.  The key is to make the upper arm flow naturally into the upper forearm.  I heavily rely on images off arms in this position during this stage of the sculpting process.
  3. I know the shape looks a little strange right now but in a couple more pictures it will all makes sense. See how I blend the muscles from the upper to the lower arm?
  4. Still bulking out the sides, front and back of my arm.  Right now I am only focusing on the upper arm and upper portion of the forearm.
  5. Very rough image but the progression is really coming along now.  All I have to do now is smooth and round out the muscles in the arm. Read the rest of this entry »

Sculpting An Arm

Posted by goregt On June - 15 - 2007

Starting to sculpt the arm

OK, we have a good start on the face, made pretty good progress on the torso and sculpted the fiddle and a hand.  Now it is time to start making the Fiddler look like an actual fiddler.  I’ve been wanting to attach the fiddle to my sculpture for some time now but in order to do so I need to first build out the arm.

Now I started the beginning stages of the arm some time ago so the torso in some of the images isn’t as far along as it is in some of the more recent tutorials.  The first two images in this tutorial were taken quite awhile back while the rest of the images were taken recently.  I had plans to do the arm earlier in this series but decided it would be best to put it together after the fiddle was completed.

Read the rest of this entry »

VIDEO

Enter the video embed code here. Remember to change the size to 320 x 270 in the embed code.

TAG CLOUD

Recommended Sites

About Me

Nothing special, just a self-taught sculptor having fun with my art and showing all of you the tips and tricks I use to create my own artwork

Twitter

    Photos

    Activate the Flickrss plugin to see the image thumbnails!