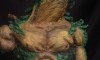
There are several different ways that I could approach sculpting the scars on my sculpture and no one way is really better than the other. Since I’m working with polymer clay, Super Sculpey to be specific, the easiest approach in my opinion is to roll out snakes of clay and remove the unwanted pieces. If I was working with wax I may take a different approach such as adding small balls of wax one at a time but I would have to experiment first before confirming.
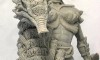
* Note: I’ve blocked out parts of the sculpture in case anyone is sensitive to nudity. Once I’m finished I’ll add a link to an uncensored picture of the sculpture for anyone that wants to see the complete design. This will be done at the end of the tutorial and for now I’ll just censor the pics as needed.
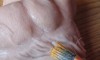
Creating the scar patterns that look like small circles
- Roll out a thin snake of clay
- Place the snake of clay along the lines of the body where you want to create the scar design (in my example right under the collar bone all the way into the shoulder)
- Using a sculpting tool, dental tool in my case, blend the edges of the clay into the bust (basically squishing the edges of the clay into the African woman’s upper chest)
- Using a sculpting tool or dull knife start creating little block patterns into the clay
- Cleanup and work the individual blocks until the have a circular appearance.
- Using alcohol and a brush cleanup the clay to create a clean and unified look.
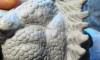
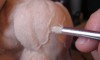
Creating the scars that look like lines
- Create little snakes of clay and apply them in a pattern that fits your design.
- Pull the edges of the clay into the base of the sculpture
The picture tutorial is below.


Next lesson – Changing the torso
Previous lesson – Tribal hair
Back to Indigenous Allure home


AMAZING! I’m going to give this a try.
This is wonderful. I understand the need for censoring sculptures (sort of) and like it that you said there would be a link to the sculpture without the black stripe. Seems like a good compromise. I don’t see the link though … and I would very much like to see the entire sculpture. Have I missed it somehow?
More than that, thank you for allowing us to watch you work!
So sorry, I see now that you said the link would not be until the end of the TUTORIAL, not just this section of the tutorial. My bad!