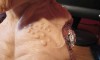
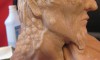
Starting to sculpt the forearm
I’m still in the bulking stage and it will probably take another lesson or two before the arm looks like anything worth talking about. The bulking stage is probably my least favorite stage in the sculpting process because whatever is being “bulked out” just looks like a big blob of goo. Nothing impressive here but it is important to show these steps before we move onto the detailed sculpting phases.
* This sculpture is created with Super Sculpey.
- Before I move too far along I think it is best to start adding a little clay to where the elbow and forearm will be. The first step is to wrap the wire with aluminum foil and from there I will add my clay.
- Starting to add the clay to the forearm now. Again, as with the upper arm, look at images on the web to see what muscles look like to get a feel on how to sculpt the forearm.
- Note: I messed up and added too much aluminum foil to the wire. It is fixable but required me removing some of the clay and starting the bulking process all over. I guess one lesson learned is that less is more when bulking out the clay. You don’t have to add wire to the aluminum foil but it seems to help the clay stick better to the wire (for me at least) and cuts down on the cost of the clay.
The detailed pictures are below.


Next lesson – Finish blocking off the arm
Previous lesson Sculpting the arm


Could you please do a tutorial specifically on pectoral and abdominal muscles on the account that im horrible at them.
Hi Adam,
I’ll try and put something together in the near future (I currently have a few projects that I’m trying to finish up now). One quick trick that I like to use is that I usually start out by roughly blocking out the individual forms and kind of draw the individual muscles from there (by drawing I mean carving the design into the clay/wax). When you block out a form think about the basic shapes. For example the chest muscles in the most simplistic form looks like large squares or bulky rectangles while the abs are a series of smaller squares. This page should also help get you started until I can put together a more detailed tutorial.
Gerald