Polymer Clay Fan

Free Sculpting Tutorials

Search Results

Fixing the forearm

Posted by goregt On July - 13 - 2007

Fixing the forearm

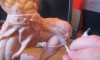
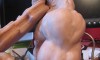
Well, I’m definitely not perfect and I am also not afraid to show my mistakes. I do learn a lot from my mistakes and I think posting them on this site also helps others learn as well. If you have been following the tutorials on this site for awhile then you may remember me mentioning that you need to be careful when bulking out a sculpture to aluminum foil. Well, now you are about to get a good example on why I said that.

Read the rest of this entry »

Sculpting the Forearm

Posted by goregt On June - 15 - 2007

Starting to sculpt the forearm

I’m still in the bulking stage and it will probably take another lesson or two before the arm looks like anything worth talking about.  The bulking stage is probably my least favorite stage in the sculpting process because whatever is being “bulked out” just looks like a big blob of goo.  Nothing impressive here but it is important to show these steps before we move onto the detailed sculpting phases.

* This sculpture is created with Super Sculpey.

  1. Before I move too far along I think it is best to start adding a little clay to where the elbow and forearm will be.  The first step is to wrap the wire with aluminum foil and from there I will add my clay.
  2. Starting to add the clay to the forearm now.  Again, as with the upper arm, look at images on the web to see what muscles look like to get a feel on how to sculpt the forearm.
  3. Note: I messed up and added too much aluminum foil to the wire.  It is fixable but required me removing some of the clay and starting the bulking process all over.  I guess one lesson learned is that less is more when bulking out the clay.  You don’t have to add wire to the aluminum foil but it seems to help the clay stick better to the wire (for me at least) and cuts down on the cost of the clay. Read the rest of this entry »

Fiddler Sculpting Series

Posted by goregt On August - 9 - 2009

The Fiddler

sculpture of a fiddler

Ever hear Charlie Daniels “The Devil Went Down to Georgia” song? Well if you have a pulse and are over the age of twelve then you probably have. To make a long story short I thought I would do a sculpture based off of that song. Not that it is my favorite song in the world or that I’m Charlie Daniels number one fan (although I do think it is a pretty cool song), I just thought it would make an interesting sculpture.

I’m going to put together a series of tutorials for this sculpture where you can see step by step how the sculpture is created. Now keep in mind that at first the sculpture is not going to look like much but over time, as the series progresses, you should be able to see how I turn a block of clay into a unique piece of art. I think this will be a fun lesson for everyone and a great way to see how a sculpture comes to life. I will add links to the different lessons below so bookmark this site and come back frequently to see the latest lessons. It takes me over 100 hours to complete a sculpture so don’t expect this thing to be completed over night ;-)

Read the rest of this entry »

Fixing the left arm

Posted by goregt On July - 13 - 2007

Working on the left arm

I think the theme for my latest tutorials is going to be about fixing mistakes.  I did not do a very good job with the armature at the beginning of this sculpture and I am now paying for it.  Basically the clay is too heavy for the shoulder and arm to support all of the weight.  I’m now having issues where the shoulder is splitting in half because of the weight of the arm and the fiddle.

Right now the only way that I see to resolve this issue is to bake the shoulder and arm as one piece and attach it to the Fiddler’s torso at a later time.  Most likely I’ll still have a weight issue at the point I attach the arm at so my workaround for that will be to partially bake the entire area where the shoulder attaches to (I’ll cover that in more detail later on)

Read the rest of this entry »

Sculpting the ears

Posted by goregt On July - 13 - 2007

Sculpting the Fiddler’s ears

I’ve been using these rough placeholders as ears for awhile now and it has gotten to the point where they are starting to bug me.  Ears take some patience to sculpt also so I have been putting them off for awhile.

Since I am sculpting the devil in this piece I decided to give him pointed ears shaped like an elf’s.  Just another tweak to add to the overall look of the piece.

* This sculpture is created with Super Sculpey.

Read the rest of this entry »

Finish blocking off the arm

Posted by goregt On June - 17 - 2007

Finish blocking off the arm

In the previous lessons covering the arm on this sculpture the goal was to get a basic shape for the right arm.  Now it is time to start refining the shapes so that we can begin working on the details for the arm.

A lesson or two back I made a comment that the arm was going to look like a mess for awhile.  This is the lesson where the arm starts really looking like a muscular arm.

* This sculpture is created with Super Sculpey.

  1. Just as before I draw in lines to represent the individual muscles of the arm.
  2. I start adding a little clay here and there to bulk up the individual muscles.  The key is to make the upper arm flow naturally into the upper forearm.  I heavily rely on images off arms in this position during this stage of the sculpting process.
  3. I know the shape looks a little strange right now but in a couple more pictures it will all makes sense. See how I blend the muscles from the upper to the lower arm?
  4. Still bulking out the sides, front and back of my arm.  Right now I am only focusing on the upper arm and upper portion of the forearm.
  5. Very rough image but the progression is really coming along now.  All I have to do now is smooth and round out the muscles in the arm. Read the rest of this entry »

Sculpting An Arm

Posted by goregt On June - 15 - 2007

Starting to sculpt the arm

OK, we have a good start on the face, made pretty good progress on the torso and sculpted the fiddle and a hand.  Now it is time to start making the Fiddler look like an actual fiddler.  I’ve been wanting to attach the fiddle to my sculpture for some time now but in order to do so I need to first build out the arm.

Now I started the beginning stages of the arm some time ago so the torso in some of the images isn’t as far along as it is in some of the more recent tutorials.  The first two images in this tutorial were taken quite awhile back while the rest of the images were taken recently.  I had plans to do the arm earlier in this series but decided it would be best to put it together after the fiddle was completed.

Read the rest of this entry »

VIDEO

Enter the video embed code here. Remember to change the size to 320 x 270 in the embed code.

TAG CLOUD

Recommended Sites

About Me

Nothing special, just a self-taught sculptor having fun with my art and showing all of you the tips and tricks I use to create my own artwork

Twitter

    Photos

    Activate the Flickrss plugin to see the image thumbnails!