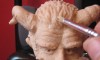
Caliper
If you ever plan to sculpt anything that is symmetrical in design then a caliper is a must. Calipers are an important sculpting tool because they help you accurately measure of length, width and distance of the different pieces that make up a sculpture. There may be some sculptors out there that can accurately sculpt a symmetrical design by sight alone but for us mere mortals the caliper is a must have tool.
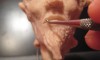
If you have been sculpting for some time and do not own a caliper, there is a very strong chance that at one time or another you still have used a very crude and basic caliper tool. What I’m talking about is your thumb and index finger. Have you ever sculpted an arm on one side of the body and use your thumb and index finger to measure the length so that you could accurately match it to the arm on the other side of the body? How about when you sculpt a face or a torse, are you like me and draw a center line seperating the object into two? Did you ever use a string, a ruler or your fingers to check that both halves of the face or torso were even in both the width, length and thickness?
If you answered yes to any of these questions then you have turned your thumb and index finger into a very crude caliper. The problem with the “homemade” version of caliper is that it doesn’t always provide the most accurate results. A professional caliper eliminates the guessing game and gives the artist the ability to take measurements with ease. Unlike some of the other tools that are required for sculpting, this is really only a onetime investment. You wont use it all the time but it is a real gem in those situations when an accurate measurement is needed. Read the rest of this entry »