Sculpting the eyes
There are a variety of different ways to sculpt eyes and the technique that should be used really depends on the type of eyes you are looking to create. I’ll probably paint this piece with a bronze like finish so I want a more classic feel to my eyes. For these types of pieces I like to sculpt a hole where the pupil and iris are located. The hole creates a neat illusion and is a really nice way to sculpt the eyes. Now if you wanted to paint your eyes then you will probably not want to sculpt a hole for the pupil (and or iris).
For me personally the eyes and the hands are the hardest things to sculpt. The eyes tell so much of the story in your sculpture so if they are off it can really mess up the entire piece. These steps may seem pretty simple but they can be a real challenge. I probably sculpted the eyes on this piece 4 or 5 times until I got it close to what I am looking for. Don’t get discouraged if you also struggle with the eyes, just keep practicing until you get it right.
 |
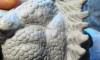
Take two small balls of clay and press them into where the eye sockets are located. The eyeballs are not flat so you do not want to press them in all the way. |
 |
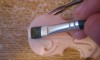
Using one of my sculpting tools (actually a dental tools) I squish or pull the edges of the eyeballs into the clay. |
 |
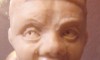
Here is what the eyes look like at this stage. Nothing ground breaking but we are making good progress. Don’t forget to keep checking the sculpture in a mirror to find any symmetry mistakes (like one eye being located higher then the other eye) Note: If you do not want to carve out the iris and the pupils you can skip the next step (for example if you want to paint the eyes on the sculpture). |
 |
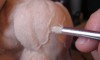
Ok, this steps seems easy but in reality it is really easy to screw up at this stage. Using a pointed tool carve a circle into the eyes. The good news is if you screw up it is easy to fill the hole with some clay and start over again. Make sure the holes are aligned correctly before moving onto the next stage. |
 |
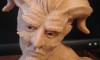
All right, time for the eyelids. Roll a couple of snakes in the clay for the upper and lower eyelids. Right now I just place them onto the face. I’ll worry about trimming the edges once everything is laid out. |
 |
Also repeat for the upper eyelid. Using a sculpting tool pull the edges of the eyelids into the face. The upper eyelid usually sticks out further then the lower one so I will also add another snake of clay to the upper lid (on top of the first eyelid). |
 |
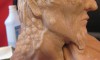
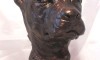
And here you go, we have now redone the lips and the eyes. Getting closer to completing the face now. |
Next lesson Starting the fiddle
Previous lesson Sculpting lips