Polymer Clay Fan

Free Sculpting Tutorials

Archive for September, 2009

Tribal Back – 1

Posted by goregt On September - 30 - 2009

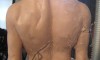
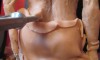
Sculpting a back can be a little tricky and I’ve always found it to be a bit challenging as well. There are a lot of different muscles and bones that make up the back and more importantly the shapes they create come and go into all different directions. Now sculpting a back with more body fat on it would decrease the difficulty but I prefer designs of a leaner physique. However, the key with this sculpture is to not go too lean on the back because it will not flow well with the rest of the design.

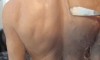
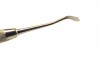
I have already sculpted a rough shape of the back when I blocked out the torso. Now I need to tie the individual muscles together while trying to make it look natural. Using a sharp sculpting tool I like to draw out some of the individual shapes. Basically I’m trying to break out the scapula, traps and lower lats into different basic shapes. Once this stage has been completed I will build out the individual forms. Read the rest of this entry »

Blending in the Scars

Posted by goregt On September - 29 - 2009

OK, for this lesson I will briefly cover the steps for blending the small round scars. I like to first layout my design before blending the shapes into the rest of the sculpture. The reason why is because if my spacing is off or I don’t like the way the design is taking shape I can easily make changes. Otherwise I would have to scrape away clay, smooth out the belly and start over.

Once I have everything where I want I just take a flat edge sculpting tool and blend the edges of my small ball shaped scars. The key is to make sure you blend all of the edges. To accomplish this I like to look at the sculpture from all kinds of angles. It is amazing how a sculpture changes when you look at it from a different angles, everything may like fine from one end while when you look at it from the other end all kinds of mistakes or imperfections appear. The same point holds true when painting a sculpture but that is another tutorial in itself. Read the rest of this entry »

9 the Movie

Posted by goregt On September - 28 - 2009

This past weekend I took my kids to see the movie 9.  For those that are not familiar with the movie it is a post apocalyptic story where the human race has been annihilated by machines.   The basis for the plot has been used over and over again for decades now but the story of 9 separates itself from the predecessors in that in a last effort to save humanity a brilliant scientist has given his own life to bring life to nine different rag dolls.

I personally would rate 9 as one of the best animated movies that I have ever seen.  I loved the way the story unfolded before my eyes and the quality of the animation was nothing less than superb.  The characters and the creatures in the movie were brilliantly designed.  It was no surprise finding out that Tim Burton was one of the producers of this movie and you could feel his presence in both the landscape and character designs.

For those of you that have little ones and are wondering if this movie is appropriate keep in mind that 9 is rated PG-13.  There is a reason for the PG-13 rating and the movie is very intense with some scary action sequences.   This movie was a little more intense than I expected and some of the scenes were pretty scary for my six-year-old (I guess I won’t be winning the “Dad of the Year” award this year).  Don’t get me wrong my son did enjoy the movie but if you also have little ones you may want to screen the movie first a then decide if your own kids are up to it. Read the rest of this entry »

Clayburn Moore

Posted by goregt On September - 25 - 2009

Clayburn Moore has to be one of the most talented artist for sculpting the human form that I have ever seen. The level of detail, the shape and the accuracy of the individual muscles are truly amazing. As impressive as Clay’s sculptures are of the male form, it is probably his sculptures of the female physique that really grabs my attention. I personally find that sculpting females is a lot harder than sculpting males. It may be that I’m just more familiar with the male physique or that I have a lot more experience sculpting the male form. It’s a common issue with a lot of sculptors and one that I just have to continue working at to improve.

However Clayburn Moore is unique in that he is capable of masterfully sculpting both the male and female forms. I do not know if he finds one form more difficult to sculpt than the other but his end results are truly amazing. Oh, and before I forget to mention it a lot of Clay’s detailed and impressive sculptures are created in polymer clay. Living proof that it is possible to sculpt highly detailed and complex sculptures in polymer clay. Read the rest of this entry »

Adding Back the Scars

Posted by goregt On September - 24 - 2009

I know I just recently put together a lesson on sculpting the scars but the pictures for that lesson were taken a couple of years ago so I thought I would reinforce that lesson and also show you another way to create the individual scars. The previous lesson for sculpting scars was Lesson 8 in this series and for those that missed it you can read it at the following link – Tribal scars

There is an old saying in the US that there is more than one way to skin a cat. For those of you that read this blog from another country the saying simply implies that there is more than one way that you can do things. The saying hold true for sculpting and one way is not necessarily better than another. It really just comes down to your personal preference. I’ve outlined the steps for this lesson below. Read the rest of this entry »

New Torso

Posted by goregt On September - 23 - 2009

Now that the sculpting for the belly button and the stomach are now complete I can move on and start adding back the scars to the front of my torso. Keep in mind that I still need to work on sculpting the back and the sides of the torso but the front part is pretty much complete. Some people may advise that you wait until the entire torso is completed before adding the details like the scars but I like to work a little differently. Adding the scars now helps give me an overall feel for the piece and the patterns that I use for the torso will help me come up with the designs I end up deciding to use o the rest of the body.

Once the scars have been added back I will start working on sculpting the back and then add scars to there as well. From there I’ll move onto finishing the arms and hands. I’ll save the textures for the skin details towards the end since I want it to be consistent over the entire sculpture. Read the rest of this entry »

Resculpting the Belly

Posted by goregt On September - 22 - 2009

The next phase in this project is to start fixing some minor issues that I had with the original belly. Basically the main issue is that in some parts the torso was too flat and needed to be pulled out more. I’ve already sculpted my belly button so I want to be careful that I do not mess up any of the details in that area.

I’ve broken down my steps below.

  1. Draw a line outlining the location of the sternum and the center line for the belly.
  2. Add small balls of clay to bulk out the areas that need to be pulled out more. In this case I need to pull out the skin over the sternum, the portion of the belly above the belly button and the sides of my figure.
  3. Blend the balls of clay into the base of the belly
  4. Smooth out with my finger Read the rest of this entry »

Sculpting the Belly Button

Posted by goregt On September - 21 - 2009

In this next tutorial I will walk you through the steps for sculpting a belly button. Belly buttons are actually made up of interesting shapes and there really is a lot more to sculpting them then just creating a hole inserted into the clay. Now belly buttons come in all types of shapes and designs but there are some traits that are common in most belly buttons. For instance there are small folds of skin in and around the belly button. Also, if you look closely the design and shape of the stomach also changes around belly buttons as well.

Because belly buttons come in all kinds of shapes and sizes there are many different types of belly buttons that you can sculpt. Keep in mind that this tutorial is just one example of how a belly button can look. So use this tutorial as one option for sculpting a belly button and see what designs you can come up with. Read the rest of this entry »

Calipers

Posted by goregt On September - 18 - 2009
Caliper

Caliper

If you ever plan to sculpt anything that is symmetrical in design then a caliper is a must. Calipers are an important sculpting tool because they help you accurately measure of length, width and distance of the different pieces that make up a sculpture. There may be some sculptors out there that can accurately sculpt a symmetrical design by sight alone but for us mere mortals the caliper is a must have tool.

If you have been sculpting for some time and do not own a caliper, there is a very strong chance that at one time or another you still have used a very crude and basic caliper tool. What I’m talking about is your thumb and index finger. Have you ever sculpted an arm on one side of the body and use your thumb and index finger to measure the length so that you could accurately match it to the arm on the other side of the body? How about when you sculpt a face or a torse, are you like me and draw a center line seperating the object into two? Did you ever use a string, a ruler or your fingers to check that both halves of the face or torso were even in both the width, length and thickness?

If you answered yes to any of these questions then you have turned your thumb and index finger into a very crude caliper. The problem with the “homemade” version of caliper is that it doesn’t always provide the most accurate results. A professional caliper eliminates the guessing game and gives the artist the ability to take measurements with ease.  Unlike some of the other tools that are required for sculpting, this is really only a onetime investment.  You wont use it all the time but it is a real gem in those situations when an accurate measurement is needed. Read the rest of this entry »

Changing the design of the breast – 3

Posted by goregt On September - 17 - 2009

This lesson is a continuation from the last one in the sense that I’m still working on adding and subtracting clay here and there to finalize the shape of the breast. The nice thing about sculpting with a polymer clay like Super Sculpey is that you can easily smooth out the clay with just your fingers. I’ve included some pictures below where I show how I shaped and smoothed out my sculpture using my thumb. It is quick and easy to do and I try to use my fingers as much as possible when smoothing out larger areas in the clay (belly, back, arms, etc).

Keep in mind that you if you can get the sculpture perfectly smooth with your fingers you can always use rubbing alcohol and a brush to smooth out the clay even more. The particular sculpture will end up having a texture to it by the time I’m done so my main goal at this point is to just get the shapes down. Read the rest of this entry »

VIDEO

Enter the video embed code here. Remember to change the size to 320 x 270 in the embed code.

TAG CLOUD

Recommended Sites

About Me

Nothing special, just a self-taught sculptor having fun with my art and showing all of you the tips and tricks I use to create my own artwork

Twitter

    Photos

    Activate the Flickrss plugin to see the image thumbnails!