I know I just recently put together a lesson on sculpting the scars but the pictures for that lesson were taken a couple of years ago so I thought I would reinforce that lesson and also show you another way to create the individual scars. The previous lesson for sculpting scars was Lesson 8 in this series and for those that missed it you can read it at the following link – Tribal scars
There is an old saying in the US that there is more than one way to skin a cat. For those of you that read this blog from another country the saying simply implies that there is more than one way that you can do things. The saying hold true for sculpting and one way is not necessarily better than another. It really just comes down to your personal preference. I’ve outlined the steps for this lesson below.
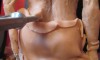
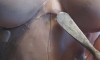
- Add thin snakes of clay to the torso. This creates the long lined scars and the process really didn’t change from Lesson 8. Just like in the previous lesson you will want to create a design with the snakes of clay.
- Blend the snakes of clay into the belly.
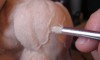
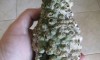
- What was different this time around is the method that I used to create the scars that are shaped like little round bumps. Instead of creating a snake of clay and cutting away sections of it, as I did in Lesson 8, I just created little balls of clay and strategically placed them across the sculpture. Either method works fine but this method seems to be the easiest for me to get the results that I was looking for.


Next lesson – Blending the Scars
Previous lesson – New Torso
Back to Indigenous Allure home