Polymer Clay Fan

Free Sculpting Tutorials

Search Results

Resculpting the Belly

Posted by goregt On September - 22 - 2009

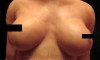
The next phase in this project is to start fixing some minor issues that I had with the original belly. Basically the main issue is that in some parts the torso was too flat and needed to be pulled out more. I’ve already sculpted my belly button so I want to be careful that I do not mess up any of the details in that area.

I’ve broken down my steps below.

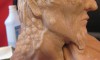
  1. Draw a line outlining the location of the sternum and the center line for the belly.
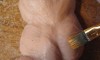
  2. Add small balls of clay to bulk out the areas that need to be pulled out more. In this case I need to pull out the skin over the sternum, the portion of the belly above the belly button and the sides of my figure.
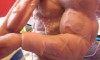
  3. Blend the balls of clay into the base of the belly
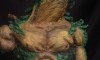
  4. Smooth out with my finger Read the rest of this entry »

Sculpting the Belly Button

Posted by goregt On September - 21 - 2009

In this next tutorial I will walk you through the steps for sculpting a belly button. Belly buttons are actually made up of interesting shapes and there really is a lot more to sculpting them then just creating a hole inserted into the clay. Now belly buttons come in all types of shapes and designs but there are some traits that are common in most belly buttons. For instance there are small folds of skin in and around the belly button. Also, if you look closely the design and shape of the stomach also changes around belly buttons as well.

Because belly buttons come in all kinds of shapes and sizes there are many different types of belly buttons that you can sculpt. Keep in mind that this tutorial is just one example of how a belly button can look. So use this tutorial as one option for sculpting a belly button and see what designs you can come up with. Read the rest of this entry »

Minotaur Base

Posted by goregt On August - 24 - 2011

I still have some work to do on my Minotaur’s head, body, etc but I wanted to go ahead an attach him to a base to get an overall idea on how the sculpture is going to look.  Adding the base is a pretty easy task with wax since there really is no need for a support system (armature) for it to be able to hold up the sculpture.  Also, another huge advantage for using wax is that I was able to create wax cast from some of my other skull sculptures.  This allowed me to add a few of my already previously sculpted skulls to the base verse having to spend a lot of time sculpting each individual piece.  I have so many projects going on right now shortcuts like the wax cast really help me move the piece along.  I’m also able to sculpt the pieces together in a way in which they look unique, so the sculpture is not “cheapened” by this process. Read the rest of this entry »

Tribal Back – 5

Posted by goregt On October - 7 - 2009

Not a lot going on with this lesson but I thought I would give a look at the back from one more angle. The left side of the back is as far as I’m going to take it until I move forward with the right half of my back. I wouldn’t recommend sculpting a back this way because it can mess up the balance of the muscles in the piece. The best approach is the sculpt the entire form at once. The only reason why I broke it down into the shapes is because I wanted to show a contrast between the two halves. Read the rest of this entry »

Tribal Back – 4

Posted by goregt On October - 6 - 2009

The top half of my back still needs some work but I want to move on to the lower back to try and pull all the shapes together. I’m going to need to start working on the right half of the back pretty soon to make sure that all the shapes are coming together correctly. Once I sculpt the right half I should get a good idea if any of the individual shapes need to be reworked.

For this step I’m sculpting the muscles and skin folds that make up the lower back. Again using a loop too I carve out the areas individual muscles. If I carve away too much I can always go back and add little bits of clay here and there but since the lower back already has too much clay I can carve away the shapes for the folds of skin (and muscles). Read the rest of this entry »

Tribal Back – 3

Posted by goregt On October - 5 - 2009

Step three in this tutorial builds on the first two steps that we used to sculpt the back. I continue to build out the individual forms by adding and removing clay to mimic the shapes in my resource material.

For this sculpture I am sculpting the details on the left side of the back first and then will move to the right side. I’m only doing it this way because it is a little easier to create a tutorial using this method. If I was just sculpting this without trying to document the process I would sculpt both side of the back at the same time. Read the rest of this entry »

Tribal Back – 2

Posted by goregt On October - 1 - 2009

In the last tutorial I briefly went over how I like to draw out a rough outline of the different muscles. I use this trick on quite a few places on the body and it really helps be understand and build out the individual shapes. For example, I like to draw out the individual muscles when I sculpt muscular arms and very lean abs. The back also has a lot going on so even though my outline is pretty rough it still helps me break down the back into the individual muscles (or shapes).

The first step is to separate my back into two halves. Now you can’t just simply carve a line down the center of the back, otherwise your sculpture will look like it has a canon going down the center of it. To make the back look more natural I will blend the two halves of the large back muscles (latissimus dorsi) into the area of where the spine is located. This task is easily accomplished by carving the center edges of the back until it gently slopes to the spine. I keep working both halves of the back until I get a look that I am happy with. Read the rest of this entry »

Blending in the Scars

Posted by goregt On September - 29 - 2009

OK, for this lesson I will briefly cover the steps for blending the small round scars. I like to first layout my design before blending the shapes into the rest of the sculpture. The reason why is because if my spacing is off or I don’t like the way the design is taking shape I can easily make changes. Otherwise I would have to scrape away clay, smooth out the belly and start over.

Once I have everything where I want I just take a flat edge sculpting tool and blend the edges of my small ball shaped scars. The key is to make sure you blend all of the edges. To accomplish this I like to look at the sculpture from all kinds of angles. It is amazing how a sculpture changes when you look at it from a different angles, everything may like fine from one end while when you look at it from the other end all kinds of mistakes or imperfections appear. The same point holds true when painting a sculpture but that is another tutorial in itself. Read the rest of this entry »

Adding Back the Scars

Posted by goregt On September - 24 - 2009

I know I just recently put together a lesson on sculpting the scars but the pictures for that lesson were taken a couple of years ago so I thought I would reinforce that lesson and also show you another way to create the individual scars. The previous lesson for sculpting scars was Lesson 8 in this series and for those that missed it you can read it at the following link – Tribal scars

There is an old saying in the US that there is more than one way to skin a cat. For those of you that read this blog from another country the saying simply implies that there is more than one way that you can do things. The saying hold true for sculpting and one way is not necessarily better than another. It really just comes down to your personal preference. I’ve outlined the steps for this lesson below. Read the rest of this entry »

New Torso

Posted by goregt On September - 23 - 2009

Now that the sculpting for the belly button and the stomach are now complete I can move on and start adding back the scars to the front of my torso. Keep in mind that I still need to work on sculpting the back and the sides of the torso but the front part is pretty much complete. Some people may advise that you wait until the entire torso is completed before adding the details like the scars but I like to work a little differently. Adding the scars now helps give me an overall feel for the piece and the patterns that I use for the torso will help me come up with the designs I end up deciding to use o the rest of the body.

Once the scars have been added back I will start working on sculpting the back and then add scars to there as well. From there I’ll move onto finishing the arms and hands. I’ll save the textures for the skin details towards the end since I want it to be consistent over the entire sculpture. Read the rest of this entry »

VIDEO

Enter the video embed code here. Remember to change the size to 320 x 270 in the embed code.

TAG CLOUD

Recommended Sites

About Me

Nothing special, just a self-taught sculptor having fun with my art and showing all of you the tips and tricks I use to create my own artwork

Twitter

    Photos

    Activate the Flickrss plugin to see the image thumbnails!