Polymer Clay Fan

Free Sculpting Tutorials

Search Results

New Torso

Posted by goregt On September - 23 - 2009

Now that the sculpting for the belly button and the stomach are now complete I can move on and start adding back the scars to the front of my torso. Keep in mind that I still need to work on sculpting the back and the sides of the torso but the front part is pretty much complete. Some people may advise that you wait until the entire torso is completed before adding the details like the scars but I like to work a little differently. Adding the scars now helps give me an overall feel for the piece and the patterns that I use for the torso will help me come up with the designs I end up deciding to use o the rest of the body.

Once the scars have been added back I will start working on sculpting the back and then add scars to there as well. From there I’ll move onto finishing the arms and hands. I’ll save the textures for the skin details towards the end since I want it to be consistent over the entire sculpture. Read the rest of this entry »

Changing the Torso

Posted by goregt On September - 14 - 2009

There is a magic word that applies to a lot of the elite sculptors and one that I personally believe every artist, sculptor or not, should become familiar with. It is one of those words that could undoubtedly help you become a very talented and skilled artist. For those artist out there that are already very skilled in their craft, it will help you improve your skills that much more.

The magic word that I am talking about is persistence. The reason why persistence is important for artist is because those that sincerely choose to be persistent in perfecting their craft really never give up at improving their skills. For example, if you have a hard time sculpting hands the key is to keep working and improving your skills until you can successfully and easily sculpt hands. No matter how many hours it takes and no matter how many times you have to start over you never quit until you can successfully reach your goal.

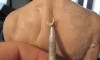
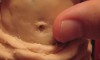
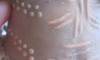
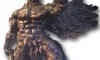
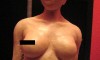
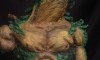
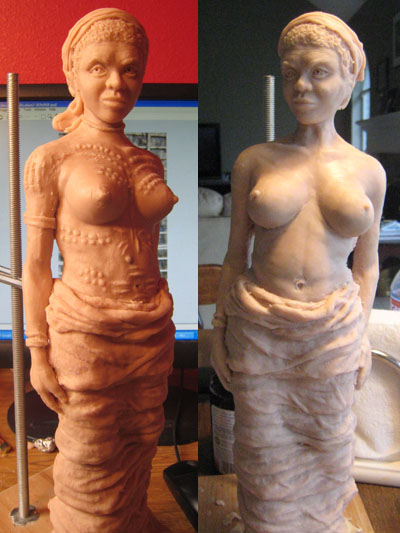
So where am I going with all of this? Basically the sculpture in this tutorial has been sitting on a shelf unfinished for over two years now. I’m now working on it again however, as one would expect, my skills over the last couple years have grown and I can now see a lot of things that I need to change with this sculpture. One of the main issues that I have with this piece is the shape and the design of the breast. I never really liked my original design for the breast and although I had spent countless hours on this sculpture I always knew it would be something that I would have to revisit at a later date. The problem is that in the original design they look augmented to me, they almost look as if they have no weight to them.

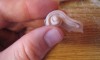
I’ve been working on resculpting the breast and over the next few tutorials I will walk you through how and why I did the design changes. What is not shown in the pictures in the upcoming tutorials is the amount of time I invested in learning how to sculpt just one breast. Now I have sculpted the female form before but as of this writing Indigenous Allure is my only nude. All of my other female sculptures have something covering their breast and although the design was not easy it was more simplified than sculpting a nude form.

I’m not going to lie, I’ve really struggled sculpting the breast on this figure. I’m not sure what the problem is, it is just a design that I have personally found challenging. I spent over two days on just one of the breast alone and through a lot of persistence have gotten the shape down to something that I am comfortable with. The hours that I have invested in sculpting just the first breast has helped me already improve my skills. The second breast, which will be demonstrated in the next tutorial took a fraction of the time to complete.

Don’t get me wrong, it is awkward for me to write an article on my difficulties for sculpting breast. However a few years ago I could have written the same article about my challenges when trying to sculpt hands or even hair. The point is that this is one of my areas of weaknesses today. However I know this is also an area that I can not only learn to master but also use to improve my overall sculpting skills. The key is to keep working at the design until I get it right. Whether it be two days or two months the key is to keep at the design until it clicks and eventually becomes easy for me. As I already stated my second attempt, although still under construction, was much easier than the first. I still have a long ways to go but my sculpting speed has already improved along with the way that I even look at the design. As much as I wanted to quit I stayed focus on my task and in the end I think that I will end up with a sculpture that I am happy with.

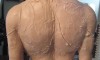
I’ve included some before and after shots of my sculpture (the design is still a work-in-progress and completed pics will be included at a later date). The uncensored pics are included in the link at the bottom of this page. Also the scars were removed to resculpt the torso, they are added back in a later tutorial.

Uncensored pics here.

Next lesson – Sculpting the Breast – 1

Previous lesson – Tribal Scars

Back to Indigenous Allure home

Sculpting Tribal Torso

Posted by goregt On July - 13 - 2007

I’ve made enough progress on the face at this stage where I can move on to the torso.  Initially when I started this sculpture I only had plans to build a bust (sculpture from the waist up).  However, after working on it for some time I decided to do a full figure instead.  The reason why I am pointing this out is because I did not build an armature for this sculpture that would support an entire figure.  So for the next couple of lessons I will be sculpting this piece as if it were going to end up as a bust and then will switch to doing a full figure sculpture.

Ideally you will want to build out the armature for the full figure from the beginning since it will produce a better and more stable armature.  However, if you feel you need to take the design in a new direction there is no reason why you can’t.  The armature that I will use in the future post is not ideal for a full figure but it will work for this piece and will allow me to make the changes in the direction of my vision.

* This sculpture is created with Super Sculpey.

Read the rest of this entry »

Torso Skin Details

Posted by goregt On April - 14 - 2007

Adding a skin texture chest and abdominal muscles

The final step in the torso detail stage is to add a skin texture to the sculpture. I love textures and I think the skin effect really does enhance the sculpture. I’ve already covered a tutorial on one way that you you can sculpt skin details in polymer clay but this lesson is going to use a different approach. Keep in mind that this type of detailing will probably not look good with all sculptures but should create a nice look for this particular piece. If I decide to paint this piece, I will probably create a bronze finish and the skin details should look good with the paint.

Time to finish up the front portion of the torso. Again, the polymer clay I am using for this particular piece is Super Sculpey.

Read the rest of this entry »

Torso Details

Posted by goregt On April - 14 - 2007

Detailing the chest and abdominal muscles

In the last lesson we bulked and defined the chest and abdominal muscles. Now it is time to start adding some detail to our sculpture. I am going to split this lesson into two separate tutorials. For the first lesson I will demonstrate how to create muscle cuts and striations in the clay and the second lesson will give examples on how I create a textured look for the skin on my sculptures.

It is important that you don’t jump to this stage too quickly. You should focus on building a good foundation using the information from the previous lessons before jumping into this tutorial. However, once the foundation is complete, I have to say that this is really one of my favorite steps in the sculpting process because it starts to change the way the art looks. Remember at the beginning of this tutorial when I said at first my art may look like a third grader created? Well this lesson moves us up a few grades in the experience level ;-).

Read the rest of this entry »

Clay Torso

Posted by goregt On April - 5 - 2007

Filling out the torso

The goal in this lesson is to continue from the previous lesson by building out all the individual shapes that makeup the Fiddlers torso. In this lesson I plan to block out the chest and abdomen areas of the sculpture. The sculpture is still going to be pretty smooth at this stage of the game but this stage is very important for getting the shape of the individual muscles down correctly. All right, now onto the torso.

Again, the polymer clay I am using for this particular piece is Super Sculpey.

Read the rest of this entry »

Sculpting Torso

Posted by goregt On April - 2 - 2007

Blocking out the body

If you have been following this series from the beginning then I think it is pretty obvious that I like to jump around a lot when sculpting. The last lesson was on starting the fiddle and this one is jumping into blocking out the body. The reason why I jump around during the sculpting process is because it keeps everything fresh. I like to go with the flow and I really enjoy the process when I work this way. In the past I have experimented with my sculpting processes and have focused on completing one area before moving onto another but found that the final art really doesn’t work out they way I envisioned it.

All right, now onto the torso. Again, the polymer clay I am using for this particular piece is Super Sculpey.

Read the rest of this entry »

Tribal Back – 1

Posted by goregt On September - 30 - 2009

Sculpting a back can be a little tricky and I’ve always found it to be a bit challenging as well. There are a lot of different muscles and bones that make up the back and more importantly the shapes they create come and go into all different directions. Now sculpting a back with more body fat on it would decrease the difficulty but I prefer designs of a leaner physique. However, the key with this sculpture is to not go too lean on the back because it will not flow well with the rest of the design.

I have already sculpted a rough shape of the back when I blocked out the torso. Now I need to tie the individual muscles together while trying to make it look natural. Using a sharp sculpting tool I like to draw out some of the individual shapes. Basically I’m trying to break out the scapula, traps and lower lats into different basic shapes. Once this stage has been completed I will build out the individual forms. Read the rest of this entry »

Adding Back the Scars

Posted by goregt On September - 24 - 2009

I know I just recently put together a lesson on sculpting the scars but the pictures for that lesson were taken a couple of years ago so I thought I would reinforce that lesson and also show you another way to create the individual scars. The previous lesson for sculpting scars was Lesson 8 in this series and for those that missed it you can read it at the following link – Tribal scars

There is an old saying in the US that there is more than one way to skin a cat. For those of you that read this blog from another country the saying simply implies that there is more than one way that you can do things. The saying hold true for sculpting and one way is not necessarily better than another. It really just comes down to your personal preference. I’ve outlined the steps for this lesson below. Read the rest of this entry »

Resculpting the Belly

Posted by goregt On September - 22 - 2009

The next phase in this project is to start fixing some minor issues that I had with the original belly. Basically the main issue is that in some parts the torso was too flat and needed to be pulled out more. I’ve already sculpted my belly button so I want to be careful that I do not mess up any of the details in that area.

I’ve broken down my steps below.

  1. Draw a line outlining the location of the sternum and the center line for the belly.
  2. Add small balls of clay to bulk out the areas that need to be pulled out more. In this case I need to pull out the skin over the sternum, the portion of the belly above the belly button and the sides of my figure.
  3. Blend the balls of clay into the base of the belly
  4. Smooth out with my finger Read the rest of this entry »

VIDEO

Enter the video embed code here. Remember to change the size to 320 x 270 in the embed code.

TAG CLOUD

Recommended Sites

About Me

Nothing special, just a self-taught sculptor having fun with my art and showing all of you the tips and tricks I use to create my own artwork

Twitter

    Photos

    Activate the Flickrss plugin to see the image thumbnails!