I’m going to put the tutorial for this series together a little differently than the other tutorials. Since I am doing a series I want to show the entire sculpting process. I’m aware that some of the tutorials will be a little redundant but I think it takes away from the series if I do not show the entire sculpting process from beginning to end.
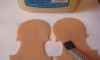
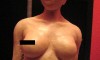
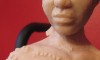
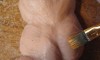
So to give you an example of what I am talking about I went into detail on how to sculpt a face in the Fiddler sculpting series. Instead of reinventing the wheel for this series, I will just show a series of pictures that give step-by-step visual instructions of the sculpting process. Just read the photos like you would a book from left to right. I will switch to my regular format if there is anything that I feel needs additional instructions.
*Tip: Hovering over the picture should give you a brief description of what I am doing at that stage. ** This sculpture is created with Super Sculpey
 |
 |
 |
 |
 |
 |
 |
 |
 |
 |
 |
Next Lesson – Tribal Face Details
Back to Indigenous Allure home


I like how you did this tutorial without any words at all!
This will be an interesting project to me. You talked about adding to or taking away from the clay. I wood carving we mostly take away so this will be quite and experiment for me when I get started. Mike