My thought process on sculpting any form that I find challenging is to break the design down into simple shapes. Lets take a hand for example, if you break it down into individual shapes the fingers are made up of small cylinders while the palm of the hand is made up of a square. Anyone can sculpt a square and a cylinder so if you think about it anyone can sculpt a very basic design for a hand. If you take it a step further you can also then break your individual parts of the hand into basic shapes. For example, the knuckles are shaped like circles while the fingernails are shaped like small squares. In just a few steps your hand has evolved from a very simplistic design into one that is a little more complex with the addition of the the knuckles and the fingernails. From this point on you just keep refining the individual shapes until you end up with a realistic looking hand.
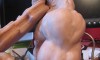
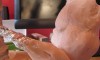
The breast after all are also nothing more than a series of shapes. At their most simplistic design they are made of a circle (or a round lump of clay). So the first step in the process of sculpting breast is to just create a round lump of clay (aligned in the correct location of the chest of course). From there on it is all about refining that shape.
In this tutorial I have cleaned up my original design a bit so that the left breast is back to its most basic form. As I’ve said in the previous tutorials the main problem with my original design is that it lacked weight. One way to quickly resolve this issue is to bulk out the bottom of the breast. The majority of the shape lies at the bottom and the breast reduce in size as you move up towards the shoulders. I’m still in the early stages of my progress at this point so my main goal is to just start expanding on my basic form until the breast starts to look more natural. Keep in mind that we are working with clay here so if you add too much you can always scrape the excess away. Just keep adding little bits and pieces of clay here and there until you get the shape down.
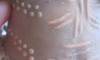
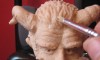
I’ve included a series of pictures below for a visual demonstration. Be sure to always look at your sculpture from different angles to make sure the design is correct.


Next lesson – Sculpting the Breast – 3
Previous lesson – Sculpting the Breast – 1
Back to Indigenous Allure home


I just became aware of your blog and web site a few days ago. I find your work just astounding. I haven’t had time to go through all the tutorials but did have a question.
I know pictures can be deceiving at times but most of your work seems to be of a larger size than most polymer clay work. Would you share how you bake these larger pieces?
Thanks .
Ed
Hi Ed,
My work is probably a lot smaller than it looks. Most of my pieces are less than 15″ in height (although I do have some pieces larger than that). In some cases I have to lay the pieces on their side when baking or partial bake them using a heat gun. Laying the pieces on their side can be an issue because the clay softens when baking and can become deformed if there is not a lot of support for the sculpture. I have a larger sculpture that I’m dealing with now (Indigenous Allure tutorial) so once I approach baking it I will but together a tutorial for it.
Regards,
Gerald