Polymer Clay Fan

Free Sculpting Tutorials

Search Results

Mirror

Posted by goregt On March - 18 - 2007

Why use a mirror when sculpting?

One of the key sculpting tips that I have found beneficial for improving the way my sculptures look is using a mirror to check the symmetry of the sculpture. Symmetry by definition, source www.dictionary.com, is the “the proper or due proportion of the parts of a body or whole to one another with regard to size and form; excellence of proportion”. So in essence the right hand should mirror the left, the left side of the face should mirror the right and so on and so on.

Usually when you create a sculpture, especially of the human form, it can be difficult to realize flaws in the symmetry. Sometimes things may appear to be a little off but it isn’t always obvious to the naked eye. There may be times when you overlook that the left eye is at a different angle then the right or tad lower then the right. There are several different tools and tips to help an artist improve symmetry but the one that I use the most, and will discuss in this article, is using a mirror to check to symmetrical flaws.
Read the rest of this entry »

Mold Making – Step Two

Posted by goregt On February - 14 - 2009

The Second Step for Making a Mold

The key ingredients for making a successful mold is planning and patience. Planning is obvious but patience can easily be overlooked. It is important that you take your time and do everything step with and precision. Otherwise what is the point of spending all that time creating your sculpture if you are not going to be able to replicate it with the same type of quality and detail.

This tutorial will cover in detail on how to make a mold box. The mold box is what is going to be used to hold the silicone while it hardens. In future lessons we will go into detail on how the final mold is created.


Read the rest of this entry »

Tribal Face Details

Posted by goregt On June - 9 - 2007

Sculpting faces is very time consuming and something that I work on throughout the entire sculpting process.  However, before I begin another area of the sculpture I like to get a good foundation for the face.  I use to save the face for last only to discover that I ended throwing the entire sculpture off when the face was completed.  The problem is that the face would end up too big or two small for my piece.  I just recently started sculpting the face first and I think it has made a huge improvement in my overall work.

My goal is to knock out at least 80% of the face before I begin another area of the sculpture.  I will continue to bounce back to the face during the sculpting process.  Even though the majority of the work is done up front, I still end up finishing up the face around the end of the piece.  However the foundation was already built so the only thing left at the end is perfecting (to the best of my ability) the little details.

Read the rest of this entry »

Evaluating Your Art

Posted by goregt On April - 13 - 2007

A few simple tips and tricks to help you evaluate your artwork

I’m a firm believer that when sculpting you should from time to time step back and take a different look at your art. If you stare at the same thing for too long of a period of time, it can become easy to overlook minor and sometimes major mistakes within your artwork. There are several different tools or methods that I use to evaluate my art when I am sculpting.

Read the rest of this entry »

Sculpting Eyes

Posted by goregt On March - 25 - 2007

Sculpting the eyes

There are a variety of different ways to sculpt eyes and the technique that should be used really depends on the type of eyes you are looking to create. I’ll probably paint this piece with a bronze like finish so I want a more classic feel to my eyes. For these types of pieces I like to sculpt a hole where the pupil and iris are located. The hole creates a neat illusion and is a really nice way to sculpt the eyes. Now if you wanted to paint your eyes then you will probably not want to sculpt a hole for the pupil (and or iris).

For me personally the eyes and the hands are the hardest things to sculpt. The eyes tell so much of the story in your sculpture so if they are off it can really mess up the entire piece. These steps may seem pretty simple but they can be a real challenge. I probably sculpted the eyes on this piece 4 or 5 times until I got it close to what I am looking for. Don’t get discouraged if you also struggle with the eyes, just keep practicing until you get it right.

Read the rest of this entry »

Sculpting Lips

Posted by goregt On March - 24 - 2007

Sculpting the lips – time to fix some errors!

Well, I have some good news and I have some bad news. The bad news is that I checked the proportions of my sculpture in the mirror and a lot of the facial features were off. The eyes, nose, cheeks and mouth just need a lot of work. This is a good example of why you should consistently check your sculpture in the mirror when you are sculpting. I started out by checking the symmetry in the mirror but I failed to continue to do so in the later stages. If you have no idea what I am talking about then read the “Why use a mirror when sculpting” lesson first.

The good news for you is that I have to sculpt the eyes and mouth all over again. So, this is a good opportunity to show you the individual stages of sculpting the different facial features. I’ll break the sculpture features up into different lessons.

Read the rest of this entry »

Detailing the face

Posted by goregt On March - 21 - 2007

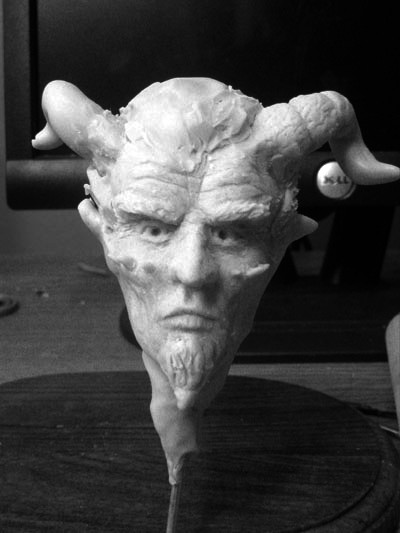
Detailing the face

1. Pupils – pupils are really easy to do. I just take a pointed sculpting tool and make little circles into the eyes. You want to build out the pupils before you add the eyelids to the eyes. I’m still not done with the eyes

2. Eyelids – roll very thin snakes and lay one on the top portion of the eye and the other snake on the bottom of the eye. Play with their placement until you get the look you are looking for. Using one of my sculpting tools I push or blend the edges of the eyelids into the face

3. Lips – The individual lips are created by drawing a horizontal line into the clay. Once I separate out the top and bottom of the lips I then bulk out the lips by adding small amounts of clay. I keep bulking out the lips until I get a shape that I am looking for (if you do too much bulking just take a little away – pretty simple step but takes some time to do). Once I get a shape I am happy with I then add little faint vertical lines to the upper and lower lips (look at your lips in the mirror to see the little lines they contain).

4. Ears – At this stage I have only added small lumps of clay to represent where my ears will be placed.

5. Horns – the horns are pretty easy. They are just large snakes or cylinders of clay that I have twisted into a shape that I like. The horns are still pretty rough at this stage so I will be building them more out in the future.

Read the rest of this entry »

Fiddler blocking the face

Posted by goregt On March - 20 - 2007

The Fiddler Stage One – Blocking out the Face

A couple of key points before we begin. The polymer clay that I use is called Super Sculpey but you can use just about any polymer clay to do these lessons (however regular Sculpey would probably present itself as a challenge). I’m a huge fan of Super Sculpey and it is predominantly the main clay that I use. Super Sculpey is just one of those clays that I feel comfortable with.

Second of all don’t judge a book by its cover. This sculpture will probably look like a third grader made it for awhile. As the lessons progress you should be able to see the sculpture advance. Everyone’s skill level is at different stages so put forth your best effort when you start sculpting and with time you should be able to knock out some really impressive art.

Read the rest of this entry »

Sculpting Tutorials

Posted by goregt On March - 15 - 2007
Sculpting Tips and Tutorials
free polymer clay tutorials Sculpting Series
Â
polymer clay sculpting tips and tricks Sculpting Tips and Tricks

Polymer Clay Sculpting Tutorials

Wax Sculpting Tutorials

General Sculpting Tutorials (not specific to one medium)

Mold Making Tutorials

  • Making a Mold – Step One (New) – Introduction into the mold making process.
  • Mold Box

  • – Step Two (
    New)
    – How to make a mold box for a two piece mold.

VIDEO

Enter the video embed code here. Remember to change the size to 320 x 270 in the embed code.

TAG CLOUD

Recommended Sites

About Me

Nothing special, just a self-taught sculptor having fun with my art and showing all of you the tips and tricks I use to create my own artwork

Twitter

    Photos

    Activate the Flickrss plugin to see the image thumbnails!