The Second Step for Making a Mold
The key ingredients for making a successful mold is planning and patience. Planning is obvious but patience can easily be overlooked. It is important that you take your time and do everything step with and precision. Otherwise what is the point of spending all that time creating your sculpture if you are not going to be able to replicate it with the same type of quality and detail.
This tutorial will cover in detail on how to make a mold box. The mold box is what is going to be used to hold the silicone while it hardens. In future lessons we will go into detail on how the final mold is created.
 The first step for building a mold box is acquiring the material. The materials needs are the following: The first step for building a mold box is acquiring the material. The materials needs are the following:
The Xacto board is very inexpensive and can be purchased at your local hobby store or Wal-Mart. I think I picked up mine for around $2 – $3 dollars. |
|
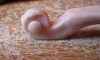
 Step Two Step TwoPlace you sculpture or individual piece of your sculpture on the Xacto board to begin defining the pieces that will be cut out. |
|
 Step Three Step ThreeOutlining the mold boxThe mold box will make up five individual pieces: base, left side, right side, top and bottom. The first step is to cut out the base. To do this measure at least 1/2 to 3/4 space around the sculpture. This includes both the top and bottom areas of the sculpture. Using a ruler and pencil draw out the lines on the Xacto board. Now I like to first draw a center line that is 1/2 – 3/4 inches from the edge of the Xacto board and then draw out my other measurements from there. This line represents where I will line up my piece (example show in the attached image). Using the Utility knife and a ruler, cut out the base piece. Next we need to measure and cutout the two sides and top and bottom pieces. The length for the sides is pretty easy since it will match the same exact measurements as the length for the base. The height is a little different story. To make sure there is plenty of space for the silicon I like to measure out a height that is at least 2 – 3 inches taller than my sculpture (too much height is better than too little height so if you are unsure add several more inches to the height of the peice). The left and right sides will mirror each other so cutout a length and height that works with your sculpture.For the bottom and top pieces, the width for these will match the width of the base. The height will match the height that you used for the left and right sides. Both the top and bottom pieces should be the exact same dimensions. ** Using a ruler to line up the edges helps get cleaner and straighter cuts. |
|
 Step Four Step FourClay bed
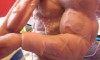
Since we are building a two piece mold, we need to basically cut the sculpture in half with our mold box. You will need to build a clay wall that covers half of your piece. In my example I have placed an imaginary line that flows through the length of the piece. The exposed part of the sculpture will represent one half of the mold while the part of the sculpture that is covered with the Klean Klay will later on represent the second half of my mold. It is important that you carefully plan your design at this phase. You want to be careful of weird angles and sharp undercuts since there will be potential for the resin to trap air into the mold when it is time to create a cast of your sculpture (air bubbles in resin create holes in the sculpture cast). When you pour resin into your mold think about how the liquid resin will flow and how the air bubbles will move within the spaces. Since air flows upwards, you need to try to design a layout that prevents the air bubbles from getting trapped in corners and other areas of the mold. |
|
 Step Five Step Five
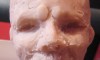
Using Alcohol and a paint brush clean up the clay that is butted up against your piece. Make sure that the clay fully surrounds the piece. Silicone when poured will pick up the finest details and holes in the clay wall will result in silicone seeping through and covering parts of the sculpture that is in the clay bed. |
|
 Step Six Step Six
|
|
 Step Seven Step Seven
Building the mold box wallsSince we already have our sides and top and bottom pieces cut out all we have to do now is put everything together. This is where packing tape really comes in handy. Tape the sides and bottom and top pieces together to form a box. Where the corner meet, add a strip of tape so that there are no openings for the silicone to slip through. |
|
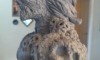
 Here is an example of my completed mold box. Here is an example of my completed mold box. |
|
 And a few more examples of mold boxes for pieces in different sizes and shapes. And a few more examples of mold boxes for pieces in different sizes and shapes. |
Next lesson – Mold Making Step Three
Previous lesson – Making a Mold – Step One