Polymer Clay Fan

Free Sculpting Tutorials

Archive for August, 2009

Barnacles on a Beer Bottle

Posted by goregt On August - 31 - 2009

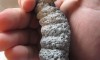
My kids and I recently went fishing and while my youngest was unable to catch fish, he did manage to find a beer bottle covered in barnacles (he’s six btw). I can already feel the “deer in the headlights look” as you are probably staring at the screen wondering what in the world does a barnacle covered beer bottle have to do with sculpting. Well, while most people probably would have discarded the bottle, I on the other hand was drawn to it.

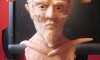
Most of the reference material that I use when I sculpt is a collection of the different images that float around the web. In most cases this works out pretty well for me. At times it takes hours and even days of research but for the most part I seem to find enough reference from Google Images to allow me to work out the forms and details on my artwork.
Read the rest of this entry »

My First Polymer Clay Sculpture

Posted by goregt On August - 28 - 2009

When I first started sculpting with polymer clay I basically only had around six weeks of sculpting experience. Up to that time the only clay that I even knew existed was a water based clay. For those of you that still sculpt with water based clays my condolences. To say that they are a challenge to work with is an understatement (unless you are using them for pottery or something along those lines).

I’ve always been one to push myself to the limits with my art and my first polymer clay sculpture was no exception to that rule. I wanted to create a sculpture that was both dynamic and unlike anything that I had ever seen before. I personally have always liked artwork that depicted angels so for my first piece I decided to create a piece that was my own version of how I think an angel would look like.
Read the rest of this entry »

Armature Wire

Posted by goregt On August - 27 - 2009

Armature WireIn a few of the older sculpting tutorials on this site I briefly talked about using an armature for supporting the sculpture. From time to time I receive emails from some of the newer members of the sculpting community asking exactly what an armature or armature wire is. So for the newer members to the sculpting family I thought I would go ahead and put together a brief explanation on what an armature is and why it is needed.

Basically the armature makes up the support system of the sculpture. A good analogy is to think of an armature as the skeleton for your artwork. In the human body the skeletal system is designed to support and hold up the body. The armature basically has the same type of role for your sculpture.

Read the rest of this entry »

Sculpting Tentacles – Lesson Two

Posted by goregt On August - 26 - 2009

If you are using a polymer clay and are happy with the results from the previous lesson then I would recommend that you go ahead and bake your sculpture. It’s not a requirement but you will mess up the details if you like to hold your sculpture in you hand while you sculpt. If you choose to bake your polymer clay sculpture make sure that you apply Vaseline to the baked piece before proceeding with this tutorial. Read the rest of this entry »

Sculpting Tentacles – Lesson One

Posted by goregt On August - 25 - 2009

I’m going to use wax for this tutorial but the same effects can be achieved with polymer clay.

Tools needed:

Read the rest of this entry »

Sculpting Tentacles Tutorial

Posted by goregt On August - 24 - 2009

I’ll have to admit that I have a thing for the sea lately and a lot of my more recent artwork uses the sea as a common theme. So far I’ve sculpted a female warrior on a giant seahorse and I’m currently working on another personal project that is half woman and half octopus (kinda cool 😉 ). I have quite a few other ideas floating around in my head but as always time seems to be against me. Read the rest of this entry »

Mold Making – Step Five

Posted by goregt On August - 21 - 2009

After the silicone in the second half of our mold box has cured it is time to remove our sculpture from the mold.  I’ll go ahead and warn you ahead of time that in most cases your sculpture, or at least part of it, will get destroyed in the process.  The steps for this lesson is documented below.

  1. Remove the mold from the X-acto board mold box.  Carefully separate the two mold halves.
  2. If any of the silicone is sticking together (an area that was not covered with Vaseline), use an razor blade to carefully cut the silicone.
  3. Remove the sculpture from the mold Read the rest of this entry »

Mold Making – Step Four

Posted by goregt On August - 20 - 2009

In the last lesson we covered the steps on how to create one half of our silicone mold.  The next and final step is to create the second half of our mold.  I have documented the  process below.

  1. Once the silicone has cured it is time to cleanup the portion of the sculpture that was covered with the clay bed that we created in lesson two on this tutorial.
  2. The first thing that I do is remove the X-acto board box.  Be careful not to destroy the box since we will be using again for the second half of our mold.
  3. Once the box has been removed carefully remove the clay bed from the sculpture and the cured silicone.  I use alcohol to cleanup the remaining clay off of my sculpture and the silicone covering the first half of my piece. Read the rest of this entry »

Mold Making – Step Three

Posted by goregt On August - 19 - 2009

In the last lesson we covered the steps to created a mold box. Creating the mold box is half the formula in the mold making process and the next step will bring us closer to being able to replicate our artwork. The next process is time consuming and dirty but the results are worth every bit of the effort.

  1. In the fist lesson we went over silicone as one of the materials needed for making a mold. There are a quite a few different brands of silicone out there so the key is to follow the manufacture instructions on whichever silicone you choose to use. My silicone of choice is the Smooth-On Mold Max 20. It’s a great rubber to work with and has been worth every penny in my investment. The rubber comes in a two parts (the silicone and the catalyst)
  2. A scale is crucial for weighing out the silicone. Ideally a digital scale would be preferred but a food scale can work just as well (just don’t use it for food anymore). Normally what I do is calibrate my scale so that the weight of the cup brings the scale to zero (0). I also pour my silicone in stages, for example if my box requires 30 ounces of silicone I’ll pour 10 ounces at a time (with 10 ounces of Part A and one ounce of Part B – the mix ratio is included with the instructions on the silicone but in most cases it is 10:1).
  3. Follow the manufacture instructions for stirring the silicone. A paint stick works great but keep in mind that as the silicone thickens it will become harder to mix. I usually mix mine for a minimum of 3 to 6 minutes. Make sure that the color is consistent all the way through (in my case the color is a bright pink). You do not want to see streaks of the base color in the mix (doing so will result in sections of the silicone not curing). Read the rest of this entry »

Fiddler Completed

Posted by goregt On August - 18 - 2009

Completed Sculpture

After completing the shoulder details and baking the sculpture I was pretty much done (except for some of the details in the back and painting the sculpture which were not documented for this piece).  For those that have been following this series my apologies, two years is much too long to add the completed tutorials.  My art and sculpting style has changed a lot since then but I still wanted to go back and finish this tutorial for everyone that had been patiently following it.

Read the rest of this entry »

VIDEO

Enter the video embed code here. Remember to change the size to 320 x 270 in the embed code.

TAG CLOUD

Recommended Sites

About Me

Nothing special, just a self-taught sculptor having fun with my art and showing all of you the tips and tricks I use to create my own artwork

Twitter

    Photos

    Activate the Flickrss plugin to see the image thumbnails!