Polymer Clay Fan

Free Sculpting Tutorials

Archive for May, 2007

Using Alcohol on Polymer Clay

Posted by goregt On May - 31 - 2007

Using Alcohol With Polymer Clay

Rubbing Alcohol is a great tool that is used to help smooth and blend polymer clay when sculpting.  Like the Vaseline tutorial, I have several other tutorials where I give examples on how I use alcohol while sculpting (I’ve included a few examples at the bottom of this page).  When I first started sculpting I used water based clay (I had never even heard of polymer clay at that time).  With the water based clay I was able to achieve a smoothing and blending effect by using a wet sponge or Q-tip.  However, when I started using polymer clays, water did not have the same effect.  At first I tried to use water and Q-tip on my polymer clay but the results were pretty poor.  After doing a lot of research on the internet I discovered that rubbing alcohol dissolves polymer clays.  Thanks to other polymer clay artist I was able to learn that alcohol on a Q-tip, sponge or paint brush has the same effect as water on water based clay. I have experimented with different potencies of rubbing alcohol and found that not all are created equal.

Read the rest of this entry »

Vaseline

Posted by goregt On May - 31 - 2007

Using Vaseline With Polymer Clay

I’ve already covered the use of Vaseline in a few of my tutorials but though I should also do a little write up on it under the tools section of this site. Vaseline, or Petroleum Jelly, is used to help non-baked clay, which I will refer to as new clay in this article, stick to baked clay. One of the benefits of working with polymer clay is that you can bake the sculpture multiple times during the sculpting process. This key advantage allows you to bake the sculpture in stages verses having to sculpt the entire piece before baking. Read the rest of this entry »

Attaching the scroll to the fiddle

Posted by goregt On May - 28 - 2007

Attaching the scroll to the neck of the fiddle

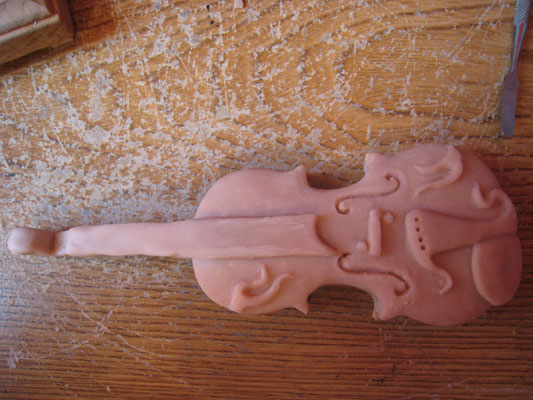
polymer clay fiddleIn the previous tutorial I did a rough sculpt of the scroll (top piece) for the fiddle.  The next step is to add the scroll to the neck of the fiddle.  Once attached I will then begin to work on the details.  The process for adding the scroll to the neck of the fiddle is the same process that was used to add the neck to the body.  The first step is to lightly coat the baked pieces of clay with Vaseline, then take a tissue and wipe the excess off.  Next just add a new thin layer of clay and the scroll should easily attach from there.

Read the rest of this entry »

Polymer Clay Vase

Posted by goregt On May - 26 - 2007

Creating a Marbled Vase

This is a quick and easy tutorial that will demonstrate how to take a plain Jane glass vase and turn it into a work of art with the help of a little polymer clay. This is the first time I have ever done something like this myself so at the end of the page I will cover some lessons learned.

This really is a simple tutorial and I’m convince just about anyone can easily create a marbled vase. If it seems a little challenging at first then just keep practicing and it will come to you in no time at all.

The polymer clay I am using for this particular piece is Premo.

Glass vase filled with Premo polymer clay No need to cringe, you do not need that much clay for this tutorial. I was shopping at my local Hobby Lobby and went a little overboard on the clay. All is good since I will have plenty of clay for future projects. To give you an idea on how much clay you will need, I ended using less than one block of two or three colors by the time the vase was completed (My glass vase is around five (5) inches tall).Note: Make sure the glass vase that you purchase can be baked in an oven.
Polymer Clay Premo The first step is to condition the clay. Premo is a little firmer then the clay I normally use, Super Sculpey, so a pasta machine comes in handy here. I’m only using two colors on my vase so I keep rolling out the clay until it is fully conditioned.
Marbled clay The next step is the mix the two colors together and roll them both through the pasta machine. I repeated this step several times until I got a design I was happy with. Just roll the clay, fold, squish it together and roll it again. You don’t want to fully blend the clay, the key here is to keep the marbled look.
Applying polymer clay to the vase Simply press the clay onto the glass vase. I started from the bottom and worked my way up on this piece.
Polymer clay vase tutorial Still applying clay to the vase.
Smoothing out the clay Using one of my dental tools I blend the individual pieces together. Spend some time on this stage since you want the clay to look as if it was on piece. Try to avoid parting lines if possible.
Polymer clay vase art Once you create your own vase you will see how easy this tutorial really is. I personally like to try and take things to the next level when I create my art. A marbled vase is cool but a marbled vase with art hanging off of it is much cooler. I sculpted an Indian on my vase just to give it a little something extra.Tip: To cure the piece bake it in the oven at 275 degrees for 30 minutes (per 1/4 of an inch).
Profile of polymer clay vase A side view of my vase.Probably 98% of the colors on this vase are made up of clay. I added a little paint to tint the skin but other than that no paint was applied to this piece.

Lessons Learned

As I stated at the beginning of this tutorial, this was the first time I have tried something like this. The vase was a good learning experience for me and I did learn a few good lessons along the way. Here are a few tips I plan to use in the future:

1. Wear surgical gloves when sculpting a vase – No issues with the skin here, I just ended up with tons of fingerprints in my piece. Latex gloves would have been a quick and easy solution to avoid any fingerprints. Alcohol can remove the fingerprints but that is a lot of extra work.

2. Don’t rush the project – in all honesty this is not my favorite piece that I have created. I have a lot of other projects I should have been working on but just had to give this idea a try. I only gave myself a few hours for this piece and now looking at it I wish I would have set aside a little more time. All is not lost since I really did learn a lot by creating this vase.

3. Keep your area clean – key warning here, little clay particles lying around will somehow end up in your lighter clays. Also be sure to clean off the pasta machine before mixing different colors of clay.

That’s it! I’ll be sure to do more vases in the future and will probably show more of the sculpting stages in the process. The goal for this tutorial was to show you how you can mix glass and polymer clay to create a piece of art.

Until next time,

– Gerald
Sculpting the Scroll

Posted by goregt On May - 23 - 2007

Sculpting the scroll

Ok, soooo we have added the base (belly), a rough neck and now it is time to add the scroll (top part of the neck). The following steps are quick and easy and a good start to building a basic scroll. I still have a lot more to do to the scroll, like cleaning it up and adding the keys. However, as I have done in all the other tutorials, I always first cover the foundation or basic steps. Once you get a good foundation then adding the details is a cinch.

The polymer clay I am using for this particular piece is Super Sculpey.

Read the rest of this entry »

Attaching Fiddle Neck

Posted by goregt On May - 20 - 2007

Attaching the neck to the fiddle

Ok, now that we have a pre-baked neck for our fiddle it is time to attach it the body. For this particular sculpture there has been a lot of sculpting then baking and then sculpting again. I’ve already baked various components of the fiddle multiple times through this series and will be baking a few more times before everything is completed. Not all of my sculptures work this way, in actuality most don’t, but for this piece is just seems to be the best approach. Once a piece is baked it is hard and easier to work with. The key is to be able to add more clay to the baked piece so that you can add the details. You will wee exactly what I mean in the next couple of lessons.

The polymer clay I am using for this particular piece is Super Sculpey.

Read the rest of this entry »

Fiddle Neck

Posted by goregt On May - 20 - 2007

Cutting out the neck of the fiddle

If I had to do this all over again I would have handled the neck on the fiddle a little differently. Instead of attaching the neck at the top of the body, I would have attached it more towards the center of the fiddle’s body (part of the neck would have laid on top of the body to give it more support). It is too late to turn back now and I can still work with what I have in front of me. As I have already stated in this sculpting series, you do learn from your mistakes.

The fiddle for this particular project is coming close to completion now. I’m really looking forward to completing the fiddle because it will really change the feel of the sculpture once it is attached to the Fiddler, our subject matter for this series. I still have to build out the arms and work on the details on various other body parts but at this stage in the game I’m comfortable to say that we are past the halfway mark in the sculpting process.

Read the rest of this entry »

Bronze Finish

Posted by goregt On May - 15 - 2007

Creating a bronze finish for the dog portrait.

Bronzes do add a look of elegance to a sculpture and creating a bronze finish with paint is a pretty simple process. What I like most about a bronze finish is that it does not take long at all to complete the paint up of the sculpture.

I’m by far a better sculptor then painter so the bronze technique is an easy way for me to “complete” a project. I do from time to time paint a sculpture using technique other than the bronze finish but the process usually takes me more than a week to complete and I am running short on time for this project. Read the rest of this entry »

Dog Portrait Base

Posted by goregt On May - 14 - 2007

Sculpting a unique base for the dog portrait.

I’m only sculpting the dog’s head for this particular piece so I want to do something that gives the sculpture a little more pizzazz. Usually when I do pet portraits I like to add a unique rock formation base to the sculpture. The rocky base basically helps create a uniqueness with the piece and also gives a little more height to the sculpture.

Tools Needed

  1. Polymer Clay (Super Sculpey in this example)
  2. Sculpting tools
  3. Reference material (pictures of your subject matter or the subject matter itself)
  4. Lots of patience 😉 Read the rest of this entry »

Shaping Dogs Face

Posted by goregt On May - 13 - 2007

Shaping the Dog’s Face

Now that we have built a good foundation for our dog portrait, it is time to start adding the details that will bring our sculpture to life. The detailing stage may be the most time consuming stage in the game but really is the most rewarding stage in the entire sculpting process. It is nice to see a chuck of clay shaped like a dog turn into an actual dog portrait.

The key is to take your time and not rush through this stage. Flying through this step will show in the end results to go ahead and already plan on investing a lot of hours to get the detailing done right. The final details will not be completed in this tutorial. The goal for now is to build out the dog’s face, with wrinkles and all, and add the polishing touches a little later down the road. Read the rest of this entry »

VIDEO

Enter the video embed code here. Remember to change the size to 320 x 270 in the embed code.

TAG CLOUD

Recommended Sites

About Me

Nothing special, just a self-taught sculptor having fun with my art and showing all of you the tips and tricks I use to create my own artwork

Twitter

    Photos

    Activate the Flickrss plugin to see the image thumbnails!