July 13th, 2007 by
goregt
If you're new here, you may want to subscribe to my RSS feed or Newsletter for additional free sculplting tips. Thanks for visiting!
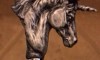
Working on the left arm
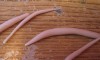
I think the theme for my latest tutorials is going to be about fixing mistakes. I did not do a very good job with the armature at the beginning of this sculpture and I am now paying for it. Basically the clay is too heavy for the shoulder and arm to support all of the weight. I’m now having issues where the shoulder is splitting in half because of the weight of the arm and the fiddle.
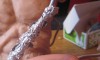
Right now the only way that I see to resolve this issue is to bake the shoulder and arm as one piece and attach it to the Fiddler’s torso at a later time. Most likely I’ll still have a weight issue at the point I attach the arm at so my workaround for that will be to partially bake the entire area where the shoulder attaches to (I’ll cover that in more detail later on)
* This sculpture is created with Super Sculpey.
 |
Using a sharp cutting took I basically removed the arm. |
| |
|
 |
I decided to change the textures a bit on this piece. I’m thinking about having this sculpture cast in bronze at a later date so I’m trying to come up with a more artistic look for the skin texture. The texture I have here gives me a feeling a movement as if the muscles were twitching and flexing while the Fiddler plays the fiddle. |
| |
|
 |
Smoothing out the textures with rubbing alcohol. |
| |
|
 |
The goal here is to only bake part of the sculpture instead of the entire arm. That way the clay covered by the aluminum foil is still soft and will be easy to attach to the Fiddler’s torso. Well, I cooked it too long and it didn’t work. No biggie, I can still add the arm to the torso, it will just take a little more work. |
| |
|
 |
A picture of me attempting to partially bake the arm. |
Next lesson - Coming soon
Previous lesson - Fixing the forearm
Back to the series home page
tag:arm mistakes polymer clay sculpting Sculpting Tutorials super sculpeyPopularity: 89% [?]
Newsletter Archive
Long Hiatus (Sent on January 26, 2009) Playing with Wax (Sent on August 8, 2008) Sculpting Again (Sent on May 10, 2008) Favorite Sculpting Tools (Sent on August 25, 2007) 1
2 3 Next »
Posted in Sculpting Tutorials |
3 Comments »
July 13th, 2007 by
goregt
Fixing the forearm
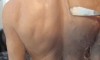
Well, I’m definitely not perfect and I am also not afraid to show my mistakes. I do learn a lot from my mistakes and I think posting them on this site also helps others learn as well. If you have been following the tutorials on this site for awhile then you may remember me mentioning that you need to be careful when bulking out a sculpture to aluminum foil. Well, now you are about to get a good example on why I said that.
I think the attached picture explains everything quite well ;-). However the cool thing about polymer clay and mistakes is that you just fix them. Yes it may slow you down a bit but the mistakes none-the-less are still fixable. I ended up having to dig out quite a bit of aluminum foil but it didn’t take too long for me to get back on track.
If you end up making a mistake while sculpting just chalk it up as a learning experience, fix it and then move on. Mistakes really are not the end of the world and in this case was just a little bump in the road.
Next lesson - Fixing the left arm
Previous lesson Sculpting the ears
Back to the series home page
tag:arm forearm polymer clay sculpting tutorial Sculpting TutorialsPopularity: 87% [?]
Newsletter Archive
Long Hiatus (Sent on January 26, 2009) Playing with Wax (Sent on August 8, 2008) Sculpting Again (Sent on May 10, 2008) Favorite Sculpting Tools (Sent on August 25, 2007) 1
2 3 Next »
Posted in Sculpting Tutorials |
No Comments »
July 13th, 2007 by
goregt
Sculpting the Fiddler’s ears
I’ve been using these rough placeholders as ears for awhile now and it has gotten to the point where they are starting to bug me. Ears take some patience to sculpt also so I have been putting them off for awhile.
Since I am sculpting the devil in this piece I decided to give him pointed ears shaped like an elf’s. Just another tweak to add to the overall look of the piece.
* This sculpture is created with Super Sculpey.
 |
Step one is to design the rough shape of the ears. |
| |
|
 |
Now that I have my rough outline, the next step is the start defining the outer ear. Little snakes of clay do the trick here. |
| |
|
 |
Now the same goes for the inner tubes and grooves in the ear. I use additional snakes of clay to create the canals in the ear. Just build out the individual shapes slowly and everything will come together. |
| |
|
 |
Now that I have my ear the way that I want it I take a brush and rubbing alcohol to smooth everything out. |
| |
|
 |
And a look of my ear with a little distance |
| |
|
 |
…. and another angle shot of my ear. |
Next lesson - Fixing the forearm
Previous lesson Spicing up the neck
Back to the series home page
tag:ear free tutorial polymer clay sculpting Sculpting TutorialsPopularity: 86% [?]
Newsletter Archive
Long Hiatus (Sent on January 26, 2009) Playing with Wax (Sent on August 8, 2008) Sculpting Again (Sent on May 10, 2008) Favorite Sculpting Tools (Sent on August 25, 2007) 1
2 3 Next »
Posted in Sculpting Tutorials |
No Comments »
July 13th, 2007 by
goregt
Spicing up the neck
I’m a very dynamic sculptor (I’ve said this before and I am sure I’ll say it again). With my own original art I usually have a basic idea of the sculpture I want to create but once I get started I just kind of make things up as I move along. Personally I view this as a strength and not a weakness because the final design usually ends up better than the original vision.
That being said the new design to the horns has given me an idea on how I can spice up the rest of the sculpture a bit. I’ll start with changes to the neck in this tutorial and will move on from there in the later lessons.
* This sculpture is created with Super Sculpey.
 |
This is actually a pretty easy tutorial that creates a dramatic difference in the look of this piece. The first step is to take little balls of clay, at various sizes, and press them into the neck.* Ignore the ear for now (I know it looks terrible). I will cover sculpting the ear in the next lesson. |
| |
|
 |
Using one of my sculpting tools a press the edges of the balls of clay into the neck. |
| |
|
 |
Smooth everything out with a little alcohol and there you have it. Note: I will go back later and add the skin details to the bumps. |
Next lesson - Sculpting the ears
Previous lesson Changing the design of the horns
Back to the series home page
tag:free tutorial polymer clay sculpting neck Sculpting Tutorials skin detailsPopularity: 84% [?]
Newsletter Archive
Long Hiatus (Sent on January 26, 2009) Playing with Wax (Sent on August 8, 2008) Sculpting Again (Sent on May 10, 2008) Favorite Sculpting Tools (Sent on August 25, 2007) 1
2 3 Next »
Posted in Sculpting Tutorials |
No Comments »
July 13th, 2007 by
goregt
Attaching the arm
I think the pictures in this tutorial explain everything pretty well so just follow the images from left to right. Since my arms will be dangling at the side this method works pretty well. If you plan to pose the arm or add additional weight to it by placing something in the hand then you would want to build an armature that supports the arm better then what I have shown below.
* This sculpture is created with Super Sculpey.
Next lesson - Coming Soon.
Previous lesson Sculpting the tribal torso
Back to Indigenous Allure home
tag:arm polymer clay tutorial sculpting tips sculpting tutorial Sculpting TutorialsPopularity: 83% [?]
Newsletter Archive
Long Hiatus (Sent on January 26, 2009) Playing with Wax (Sent on August 8, 2008) Sculpting Again (Sent on May 10, 2008) Favorite Sculpting Tools (Sent on August 25, 2007) 1
2 3 Next »
Posted in Sculpting Tutorials |
No Comments »
July 13th, 2007 by
goregt
Blocking out the torso
I’ve made enough progress on the face at this stage where I can move on to the torso. Initially when I started this sculpture I only had plans to build a bust (sculpture from the waist up). However, after working on it for some time I decided to do a full figure instead. The reason why I am pointing this out is because I did not build an armature for this sculpture that would support an entire figure. So for the next couple of lessons I will be sculpting this piece as if it were going to end up as a bust and then will switch to doing a full figure sculpture.
* This sculpture is created with Super Sculpey.
 |
I use aluminum foil and regular Sculpey to bulk out the center of the torso. This saves the amount of Super Sculpey that I have to use and helps cut down on the cost of the clay. |
| |
|
 |
I have now added Super Sculpey on top of my aluminum foil and regular Sculpey frame. The various lines in the clay indicate where the various body parts begin and end.The center line helps me split the torso in half, left to right, while the two horizontal lines help me locate where the breast begins and ends.Note: If the face looks a little different in these pictures it is because I am fixing little errors here and there as I sculpt the torso. I like to move back and forth between the different body parts when I am sculpting. |
| |
|
 |
I’ve bulked out the torso a little more in this stage and have started to better define the breast. I still have a long ways to go but the sculpture is starting to look more like a figure now.Note: I’ll go into detail on how I created the arm in the next tutorial. |
|
|
 |
Nothing special here, I am just starting to bulk out the back a little bit with my Super Sculpey. |
|
|
Next lesson - Sculpting the tribal arm.
Previous lesson Tribal Face Details
Back to Indigenous Allure home
tag:polymer clay tutorial sculpting Sculpting Tutorials super sculpey torsoPopularity: 76% [?]
Newsletter Archive
Long Hiatus (Sent on January 26, 2009) Playing with Wax (Sent on August 8, 2008) Sculpting Again (Sent on May 10, 2008) Favorite Sculpting Tools (Sent on August 25, 2007) 1
2 3 Next »
Posted in Sculpting Tutorials |
No Comments »