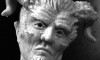
Polymer Clay Fan

Free Sculpting Tutorials

Search Results

Rolling snakes

Posted by goregt On March - 21 - 2007

Rolling snakes in the clay

In a few of the other tutorials on this site I have referenced rolling snakes or cylinders of clay. These thin round pieces of clay are useful for sculpting a variety of things like veins, hair, small horns and different features of the face. I’ve included a picture tutorial below to better explain what I am talking about.

Read the rest of this entry »

Adding Back the Scars

Posted by goregt On September - 24 - 2009

I know I just recently put together a lesson on sculpting the scars but the pictures for that lesson were taken a couple of years ago so I thought I would reinforce that lesson and also show you another way to create the individual scars. The previous lesson for sculpting scars was Lesson 8 in this series and for those that missed it you can read it at the following link – Tribal scars

There is an old saying in the US that there is more than one way to skin a cat. For those of you that read this blog from another country the saying simply implies that there is more than one way that you can do things. The saying hold true for sculpting and one way is not necessarily better than another. It really just comes down to your personal preference. I’ve outlined the steps for this lesson below. Read the rest of this entry »

Sculpting Tribal Scars

Posted by goregt On September - 4 - 2009

There are several different ways that I could approach sculpting the scars on my sculpture and no one way is really better than the other. Since I’m working with polymer clay, Super Sculpey to be specific, the easiest approach in my opinion is to roll out snakes of clay and remove the unwanted pieces. If I was working with wax I may take a different approach such as adding small balls of wax one at a time but I would have to experiment first before confirming.

* Note: I’ve blocked out parts of the sculpture in case anyone is sensitive to nudity. Once I’m finished I’ll add a link to an uncensored picture of the sculpture for anyone that wants to see the complete design. This will be done at the end of the tutorial and for now I’ll just censor the pics as needed. Read the rest of this entry »

Sculpting the ears

Posted by goregt On July - 13 - 2007

Sculpting the Fiddler’s ears

I’ve been using these rough placeholders as ears for awhile now and it has gotten to the point where they are starting to bug me.  Ears take some patience to sculpt also so I have been putting them off for awhile.

Since I am sculpting the devil in this piece I decided to give him pointed ears shaped like an elf’s.  Just another tweak to add to the overall look of the piece.

* This sculpture is created with Super Sculpey.

Read the rest of this entry »

Adding veins to the arm

Posted by goregt On June - 24 - 2007

Finish blocking off the arm

In the previous lesson we built a solid foundation for the left arm. We are now at the stage where it is time to start adding all the little details. The steps in this lesson will build off of the rolling snakes and sculpting veins tutorials (I recommend visiting those
lessons first). We will not finish the sculpting on the arm in this lesson but
by the end of the page the left arm should look like it is getting close to
completion.

* This sculpture is created with Super Sculpey.

Read the rest of this entry »

Sculpting Fiddlers Hand

Posted by goregt On June - 4 - 2007

Sculpting the Fiddler’s Hand

I already have another tutorial about sculpting a hand with polymer clay but the images were taken with my old camera and I felt this was a good opportunity give an older tutorial a fresher look. I’m only going to create a rough hand since I will later attach it to the fiddle. Hands can be a little tricky to sculpt so the key here is to spend as much time as necessary to get the sculpting down correctly.

If sculpting hands come naturally easy to you then a big kudos to you. I myself still find the hands and eyes the most difficult things to sculpt. However, I have improved because I have invested those long hours making sure that I got everything down correctly.

Read the rest of this entry »

Shaping Dogs Face

Posted by goregt On May - 13 - 2007

Shaping the Dog’s Face

Now that we have built a good foundation for our dog portrait, it is time to start adding the details that will bring our sculpture to life. The detailing stage may be the most time consuming stage in the game but really is the most rewarding stage in the entire sculpting process. It is nice to see a chuck of clay shaped like a dog turn into an actual dog portrait.

The key is to take your time and not rush through this stage. Flying through this step will show in the end results to go ahead and already plan on investing a lot of hours to get the detailing done right. The final details will not be completed in this tutorial. The goal for now is to build out the dog’s face, with wrinkles and all, and add the polishing touches a little later down the road. Read the rest of this entry »

Sculpting veins

Posted by goregt On April - 3 - 2007

How to sculpt veins in Polymer Clay

Sculpting veins is one of those things that is technically pretty easy to do but in reality takes some practice to get it down right. I think that the key to achieving well sculpted veins is to make them look like they are sitting right under the skin. I’ve seen a lot of sculptures where the veins appear as if they sit on top of the skin and it really takes away from the realism of the sculpture. Also, veins range in different sizes and shapes so you want to incorporate this into your design.

The tutorial below will walk you through the steps that I use to create veins for my sculptures. Remember that practice makes perfect so don’t give up if you do not get it right on the first try.

Read the rest of this entry »

Sculpting Torso

Posted by goregt On April - 2 - 2007

Blocking out the body

If you have been following this series from the beginning then I think it is pretty obvious that I like to jump around a lot when sculpting. The last lesson was on starting the fiddle and this one is jumping into blocking out the body. The reason why I jump around during the sculpting process is because it keeps everything fresh. I like to go with the flow and I really enjoy the process when I work this way. In the past I have experimented with my sculpting processes and have focused on completing one area before moving onto another but found that the final art really doesn’t work out they way I envisioned it.

All right, now onto the torso. Again, the polymer clay I am using for this particular piece is Super Sculpey.

Read the rest of this entry »

Sculpting Eyes

Posted by goregt On March - 25 - 2007

Sculpting the eyes

There are a variety of different ways to sculpt eyes and the technique that should be used really depends on the type of eyes you are looking to create. I’ll probably paint this piece with a bronze like finish so I want a more classic feel to my eyes. For these types of pieces I like to sculpt a hole where the pupil and iris are located. The hole creates a neat illusion and is a really nice way to sculpt the eyes. Now if you wanted to paint your eyes then you will probably not want to sculpt a hole for the pupil (and or iris).

For me personally the eyes and the hands are the hardest things to sculpt. The eyes tell so much of the story in your sculpture so if they are off it can really mess up the entire piece. These steps may seem pretty simple but they can be a real challenge. I probably sculpted the eyes on this piece 4 or 5 times until I got it close to what I am looking for. Don’t get discouraged if you also struggle with the eyes, just keep practicing until you get it right.

Read the rest of this entry »

VIDEO

Enter the video embed code here. Remember to change the size to 320 x 270 in the embed code.

TAG CLOUD

Recommended Sites

About Me

Nothing special, just a self-taught sculptor having fun with my art and showing all of you the tips and tricks I use to create my own artwork

Twitter

    Photos

    Activate the Flickrss plugin to see the image thumbnails!