The following tutorial outlines the process that I use for sculpting hair on some of my polymer clay sculptures. This is not the only method that you can use to sculpt hair however the tutorial should give you you a good idea on how to create a realistic design. Now keep in mind that the example in this tutorial is a really a simple design, more complex designs can use the same process but require some additional planning to make everything flow correctly (we can cover that at a later time in another tutorial).
I did not completely finish off the detailing of the hair in this tutorial and I will explain why at the bottom of the page.
* The polymer clay used in this sculpture is Super Sculpey
 |
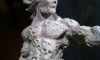
The first step is to block out the hair. I usually just add clay to get the rough shape of how I want the hair to look. After I have blocked in the hair I will then carve individual lines into the clay. At this stage I want to get an idea of what the hair may look like on my sculpture. |
 |
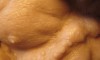
In the next step I add little snakes of clay into the air. I want to make sure that the hair on my sculpture does not look flat so I add the snakes at different sections of the head. |
 |
Now it is time to start blending the snakes into the head. I simply just pull the edges of the snakes into the clay. |
 |
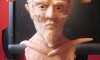
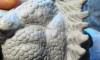
Using my sculpting tool I carve squiggly lines into the clay. The key is to move the tool from side to side so that the hair looks like it is flowing along the head. |
 |
My sculpture started to get a little too heavy so I am using a base I made to support the weight. I simply have a base with a small wire coming out of the bottom of it. The wire is inserted into the back of the head to give the sculpture a little more support.You can also see that the hair in the back of the head is not a bunch of vertical lines. I have sculpted wavy lines in a variety of directions in the clay. |
 |
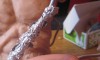
The last step is to smooth out the clay. I use a brush soaked in 91% Rubbing Alcohol to smooth out the clay. I usually do a rough job with the brush at this stage. This step can take a great amount of time so for now I’ll just get a rough idea of the overall look with the hair partially smoothed out. I will come back and finish off the hair later when I am done sculpting the face. I don’t want to invest too much time finishing off the hair at this stage because I could easily make changes when I start working on the rest of the face. |
Next lesson Sculpting lips
Previous lesson Detailing the face


Hi,
Loved your tutorial!
BTW, if you have a video version of this tutorial, why don’t you add it to sutree.com? It’s a social bookmarking service of free video lessons & tutorials (and yours will feet right in!)
Sweet dude thanks
I was kinda sucking at the hair I needed this
Good input! certainly going to use your method. thanks!
it’s going to be my first sculpture!
thanks again.