The Fiddler

Ever hear Charlie Daniels “The Devil Went Down to Georgia” song? Well if you have a pulse and are over the age of twelve then you probably have. To make a long story short I thought I would do a sculpture based off of that song. Not that it is my favorite song in the world or that I’m Charlie Daniels number one fan (although I do think it is a pretty cool song), I just thought it would make an interesting sculpture.
I’m going to put together a series of tutorials for this sculpture where you can see step by step how the sculpture is created. Now keep in mind that at first the sculpture is not going to look like much but over time, as the series progresses, you should be able to see how I turn a block of clay into a unique piece of art. I think this will be a fun lesson for everyone and a great way to see how a sculpture comes to life. I will add links to the different lessons below so bookmark this site and come back frequently to see the latest lessons. It takes me over 100 hours to complete a sculpture so don’t expect this thing to be completed over night ![]()
- Lesson 1 – Blocking out the face
- Lesson 2 – Detailing the face
- Lesson 3 – Sculpting hair
- Lesson 4 – Sculpting lips
- Lesson 5 – Sculpting eyes
- Lesson 6 – Starting the fiddle
- Lesson 7 – Blocking out the torso
- Lesson 8 – Filling out the Torso
- Lesson 9 – Finalizing the torso details
- Lesson 10 – Torso skin details
- Lesson 11 – New fiddle
- Lesson 12 – Bulking the Fiddle
- Lesson 13 – Fiddle Components
- Lesson 14 – Cutting out the fiddle neck
- Lesson 15 – Building out the neck of the fiddle
- Lesson 16 – Sculpting the scroll
- Lesson 17 – Attaching the scroll to the fiddle
- Lesson 18 – Detailing the Scroll
- Lesson 19 – Sculpting Fiddlers Hand
- Lesson 20 – Attaching Hand To Fiddle
- Lesson 21 – Sculpting an Arm
- Lesson 22 – Sculpting the Forearm
- Lesson 23 – Finish blocking off the arm
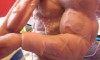
- Lesson 24 – Adding veins to the arm
- Lesson 25 – Changing the design of the horns
- Lesson 26 – Spicing up the neck
- Lesson 27 – Sculpting the ears
- Lesson 28 – >Fixing the forearm
- Lesson 29 – Fixing the left arm
- Lesson 30 – Adding hair to the elbow
- Lesson 31 – Spicing up the chest
- Lesson 32 – Attaching the arm to the shoulder
- Lesson 33 – Sculpting bumps on the shoulder
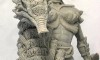
- Lesson 34 – Completed sculpture


The link you sent me to join your newsletter went into my junk mail and when I tried to use it copied and pasted….coulnt get there. So please send me it again and hopefully it will not go to junk mail….sigh….Laurel
Hi Laurel,
I use a third party company now for my newsletter. If you sign up again you should get another email.
Sincerely,
Gerald
Hey yall! I must say that I love polymer clay, first (well that’s no news, right?), but I’m very frustrated right now because of one little problem I have with super sculpey, and it is that I can never keep it clean. Has any of you guys got the same issue? Anybody can give me a little hint on how can I keep this thing pink.
I would appreciate any tip you can give me.
Thanks.
Xaverivs,
I also have the same issue at times. Since I end up either painting or making a mold out of my pieces I usually don’t worry about it too much but the dirty spots can play tricks on the eyes. One of my problems when sculpting is making sure that my hands and tools are clean (if messing around with other colored clays, etc) and making sure that the surface I lay my polymer clay on is clean as well (this is usually the biggest issue). If I’m diligent about avoiding the issue I try to make sure my hands/tools are clean before I touch my clay. I also use a clean surface like white typing paper to lay my discarded clay on.
Hope that helps.
Gerald